Build Your Own Wood Kayak
Wood is remarkably strong for its weight. It is tough, very resistant to fatigue and comes in a range of densities which makes it possible to select a material with exactly the right strength-to-weight ratio and rigidity or flexibility for most tasks. It grows on trees, and is easy, pleasant and almost safe to use.
Even in the age of plastics it is still a great material for sailing dinghies, rowing skiffs and flat-water racing kayaks. Some of the world's best flat-water racing kayaks are still made in wood veneer by Struer Kajak in Denmark, because it can be used to make a more rigid, durable hull than plastic composite.
Wood absorbs impacts, crushing forces and vibration which would shatter a plastic composite. Die-hard lovers of plastic and glass such as race yacht builders often use wood for prototypes, as a core material and in production boats for gunwales, transoms, backing pads, shroud plates and mast steps.
It can't be poured or molded into shape so it is not suitable for mass production; it has to be given a protective coating which needs replacing from time to time; and it will rot if it stays damp for too long.
None of these is really a problem for a kayak home-builder. (S)he probably wants only one kayak, finds the construction process pleasant and satisfying; intends to "dry sail" the kayak, taking it out of the water between trips and storing it indoors where rot is not a problem; and does not mind re-painting it every five years. See Protecting Your Wood Kayak.
For those building a kayak at home, the three most popular methods are:
• Plywood. Can be cheap, light and tough.
• Skin-on-frame. A wooden skeleton covered in fabric. SOF kayaks are much tougher than you might think, can be very light, but won't long withstand being dragged over rough surfaces.
• Strip-plank. This takes longer and costs more.
Building in wood - plywood
 A Kayel Angmagssalik sea kayak like this one, designed by Ken Littledyke and built from a Granta / Ottersports kit, has been paddled round Britain. A lot of plywood sea kayaks are in regular hard use in the USA and New Zealand.
Plywood construction is home-building the quick way. It is quite easy if you obtain plans and buy the materials separately. It is very easy if you buy a pre-cut kit, in fact well within the ability of a practical 12-year-old. You can build a kit kayak in three four weekends, but accessories and painting take as long again. You could build outdoors in summer, using the simplest woodworking tools.
Good plywood is tough, light and strong. It's a great engineering material as long as you keep it dry. Your editor's first kayak was a plywood one he built in his parents' living room and had a lot of fun with for several years before switching to fiberglass. Plywood can be more eco-friendly than composite or plastic but that's not necessarily so.
Any shape you can build in plywood you can build almost as easily in fiberglass. A plywood kayak can be considerably lighter but a fiberglass one will have better resistance to abrasion, need no painting and be almost unaffected by water and sun. See No Mold, But You Want A Hard-Chine GRP Kayak.
To sheathe or not to sheathe?
 If you don't mind some extra time and expense, you can make a plywood kayak as tough (and heavy) as the toughest plastic one.
You can glue on internal panels to double the thickness of the hull and deck in crucial places, and/or sheathe the whole kayak with glassfiber and resin. Some areas need particular reinforcement.
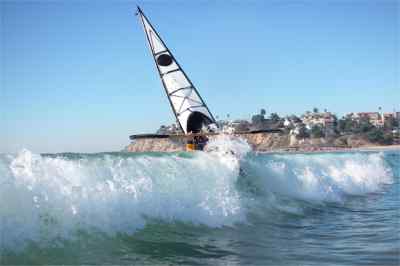
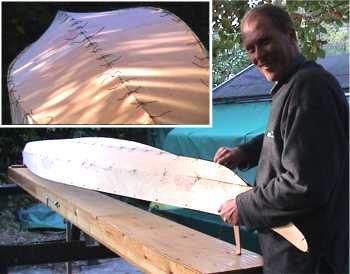
This sheathed plywood kayak, a Point Bennett, looks at home playing in surf.
On the other hand, an unsheathed plywood boat made of 4 mm marine ply can be half the weight of a fiberglass boat, very rigid and easily strong enough for estuary and fine-weather use, or more.
Sandy Ferguson has designed and built a number of marine ply kayaks over a long period. He has used them extensively, mainly around the northern half of the South Island of New Zealand though he has paddled parts of NZ from Stewart Island to the mid upper North Island. He once used 6 mm marine ply for the bottom of the hull of a double kayak which did a 40 day circumnavigation of Vanua Levi, Fiji, but generally prefers 3-4 mm.
The Banks Peninsula where he lives has many beaches composed of cobbles or larger stones. Avoiding surf launches as far as possible, he does not find it necessary to sheathe his kayaks with fiberglass. If the hull meets a sharp rock, the scratch is soon filled with a little epoxy compound.
He finds that a single kayak in 4 mm meranti weighs about 25 kg (55 lbs) including 4.5 lbs of rudder and pedals, and says "do it in gaboon and probably 21 kg. A 3 mm hull before fitting out is 13 kg, finished weight 18 kg - ready for hard use. My previous 3 mm kayak (no glass sheathing) has done ten years with lots of multi-day trips. My partner's 4 mm hull has also done ten years. She is building a new one using 3 mm Fijian maple for lightness and 4 mm gaboon for the bottom - 19 kg finished?"
Designs for plywood
The shapes you can make with plywood are limited. Try bending a steel ruler. You can bend it into a semi-circle; you can twist it into what is, geometrically, a section of a cone. But you can't do both at the same time. Plywood is the same. You could easily construct a box with plywood, but if you wanted to construct a rounded bowl you would need a lot of glue and patience.
 Fortunately, some of the best Greenland kayak designs have a boxy cross-section which is perfect for simple plywood construction. The hull can easily be built out of only four flat panels without even a partial mold.
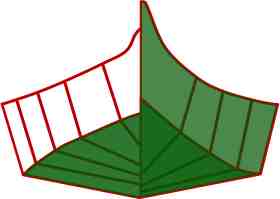
If you were to cut a Greenland kayak in half at the middle you would see that the bottom is a very flat V-shape and the sides are nearly vertical. Where the bottom and sides meet there is a sharp angle called a chine, running nearly the whole length of the hull.
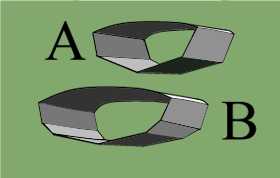 This is single chine or hard chine construction (A). It is nobody's idea of a good shape for a serious racing kayak, but many people feel it has have advantages for sea kayaks which do not aim at ultimate flat-water speed.
It is possible to make a rounder shape by using multiple chines. A Wayfarer sailing dinghy has a double chine hull (B), as do many baidarkas. A baidarka may have a triple chine hull, with performance almost indistinguishable from a round bilge hull.
To make a plywood hull, panels of precise shapes are literally stitched together. When you tighten the stitches it draws the panels up into a boat shape. To make the seams rigid and waterproof, lay fiberglass tape along each seam and brush plastic resin onto it. This is stitch-and-glue or tack-and-tape.
You can get kayak plans by post or from the Internet. See Retail Outlets - Kits & Plans. These are the two that most appeal to us:
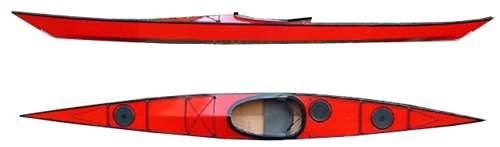
• www.rollordrown.com (this site is down at present but can be seen on the Wayback Archive here). Thanks to the generosity of designer-builder-kayaker Duane Strosaker this free site has full instructions for building three versions of the Point Bennett single kayak (16 ft 10 in to 18 ft long, 20.25 to 21.5 inches wide) and the Point Bennett tandem kayak (20 ft long, 24 inches wide). These are nice looking, low rocker, straight-running designs. Here's a photo of the single:
• www.woodenboatstore.com sells plans for Rob Bryan's Seguin design (not illustrated). 17 ft 10 in by 21.5 in. The design is not free but it's nice, and the plans come on paper from WoodenBoat magazine.
On the next page we mention a 16 ft 6 in by 20.5 in high-rocker, low volume design which is available free at Bryan Hansel's site www.Paddlinglight.com (used to be www.nessmuking.com). Although intended for strip-plank construction, Bryan says it could easily be adapted for plywood. "The hull panels are developable... the deck will have to be different... but a simple cambered deck should work out great."
Which plywood?
If you are building from plans, you will probably start by acquiring two large sheets of top-quality plywood 4 millimeters thick, and a third either 4 mm or 6 mm thick. If you intend to use your kayak in exposed waters, it is worth getting really good materials.
There are three issues when buying marine ply - cost, quality and the environment. In the USA in 2010 a single sheet of 4 mm marine ply mostly cost between $28 and $70 plus shipping.
Quality4 mm plywood usually consists of three layers of wood veneer, glued together in a sandwich so that the grain of each layer runs in a different direction to the layer alongside it. 6 mm ply usually consists of five layers of veneer. It is too stiff to twist through nearly 90 degrees as required for the bottom panels in most kayak hulls, but it makes a very good rear deck.
You do not necessarily need marine plywood. Good exterior ply and marine ply are both held together with waterproof glue; have outer veneers at least 1.3 mm thick; and minimal voids in the core. Beware bad plywood with outer layers of attractive veneer which are paper-thin so they add nothing to the strength of the core and you may go right through them when smoothing down your finished project; and core veneer(s) which are not smooth sheets of veneer but made up of lots of little pieces, of varying thickness and density with big core voids, cheap filler and even factory waste such as sawdust, paper and steel staples.
When you bend bad plywood, it won't take up a smooth curve and may snap in half. If you cut out a panel with a pointed end, the tip disintegrates before you get a chance to use it. If you do manage to incorporate it into your kayak, it will be weak. Even if your kayak is painted with epoxy resin and sheathed in glass, the wood will get damp and the glue of bad plywood may dissolve, causing the panel to delaminate after which it will have the strength of wet cardboard. Take two sheets from the same batch of budget "marine ply" and you may find that one of them is good but the other splinters when you drill it and is so soft that you could easily saw it up with a bread knife.
At one time, you could be confident that plywood stamped with BS 1088 was of reasonable quality but lately there seems to be a lot of trash with that BS 1088 stamp. The only real way to be sure is to buy plywood made by a reputable manufacturer and sold by a specialist lumber dealer. Brands with a reputation for quality include the following: Bruynzeel, Anchor, Joubert, Shelmarine and Boulter. A good name for quality does not always mean clean hands when it comes to the natural environment.
Environmental
Exterior or marine plywood is often made from veneers of certain tropical hardwoods which have a natural resistance to rot. If you buy them you make a direct contribution to destruction of the rainforest, especially if you buy plywood made of the true mahogany, Khaya. It is very likely to be the result of destructive and illegal logging whether it is Khaya ivorensis or Khaya antotheca.
Gaboon (Aucomea klaineana, also called gabon, okoumé or occumé) is a good alternative which is sometimes produced in a sustainable way in managed forests. Bruynzeel produces 4 mm and 6 mm gaboon marine ply as part of its Hechthout range, made from timber grown sustainably in Gabon. Tropical timber is not necessary for a kayak that spends most of the year indoors. You can get high-quality lightweight marine plywood made from sustainable softwood, mainly Douglas fir.
Using plywood
According to WoodenBoat magazine, if you buy an Arctic Hawk sea kayak kit from Chesapeake Light Craft it comes with an instruction manual 457 pages long. We'll describe the process briefly, just to give you an idea how it works.
For a more detailed discussion, cockpit patterns, lots of good ideas and plans for building several nice kayaks, see Stitch-And-Glue Boatbuilding: How to Build Kayaks & Other Small Craft by Chris Kulczycki of Chesapeake Light Craft. 2005, McGraw-Hill. There is also a lot of useful information in an excellent book by Richard Creagh-Osborne. Dinghy Building, 1976, Adlard Coles. Out of print, but available secondhand.
A sheet of plywood is usually is 4 feet by 8 feet (1220 mm by 2440 mm). This is a little under half the length of most sea kayaks so the bottom panels of the kayak have to be made from two shorter pieces and joined together end-to-end. The upper panels usually have to be made out of three pieces of plywood. So, you need to cut out ten pieces to make the hull.
Lay your plywood sheets down on a flat surface such as your garage floor. It is often worth covering the floor with a couple of sheets of cheap hardboard before you start.
Draw your ten shapes onto the plywood. One big advantage of plywood is that it has perfectly straight edges. To take advantage of that, make sure that the straight ends of the pieces lie precisely on the edge of the sheet.
Cut out the ten pieces with a flexible hand saw. Use a plank or log to raise the part you are cutting about 6 inches off the ground. Cut gently and hold the saw as near horizontal as possible to avoid splintering the surface layer of veneer on the other side of the sheet. When sawing across the grain, use a saw with fine teeth to avoid splintering. Consider using a Japanese handsaw as these cut when you pull the handle, not when you push, so the blade can be thinner. A few people even find they can cut plywood panels precisely to shape, with none turned into sawdust, with a craft knife. Unless you're very confident about your ability to cut precisely to shape, cut the panels out about 3 mm oversize all round except for the side which is going to join onto the neighboring panel.
Next, assemble your ten pieces of plywood so that you have just four hull panels. You could use butt joints, which means simply putting the panels together end to end and gluing a large square "butt plate" of plywood over the joint. Butt joints (A) are very quick, easy and effective.
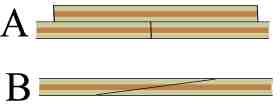 Designers often recommend scarf joints (B). These are more craftsmanlike, but in a long slim sea kayak they are seldom better than butt joints. Butt joints in 4 mm plywood will seldom create a lump or hollow which is visible when the kayak is finished (an "unfair curve"), but a slightly inaccurate scarf joint certainly will. The appearance of a good butt joint is better than that of a slightly ragged scarf joint. The main butt plates will be under the seat, just where the hull needs extra strength anyway. Still, there is a certain satisfaction in making perfect scarf joints, and the only tools required are a ruler, T-square, pencil, a very sharp hand-plane, glue and a few clamps.
 Use a boatbuilding adhesive such as urea formaldehyde resin supplied as a powder which you mix with water. Trade names include Dural, Extramite and Polymite. We also hear good things of polyurethane Gorilla Glue. A waterproof two-part epoxy adhesive will do an excellent job, but keep it off your skin. Quick-setting epoxies are often not waterproof. It may be a mistake to economize by using polyvinyl acetate (PVA) wood glue even if it claims to be strong and waterproof.
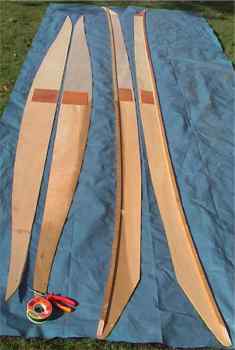
Your panels are still about 3 mm oversize all round. When you have assembled your four long thin hull panels, clamp corresponding panels together in pairs, back to back, and use a long hand-plane to reduce them to the precise size.
Then screw and glue a pair of long strips of wood, say 15 mm by 10 mm, to the top edges of the pair of panels that make up the top half of the hull. These "inwales" stiffen the top edge of the hull and give you something to which you can later attach the deck.
Before you stitch each panel to its neighbor, take a hand plane and put an angle (a bevel or chamfer) on the edges of the panels.
| In other words, cut away the inner part of the panels at an angle. Generally the bevel is about 45 degrees but it is a more acute angle towards the ends of the panels. Don't sharpen the edge of the panel to a knife edge. You need a bevel only on the inside half of the panel, just enough to make the panels sit together easily when you stitch them together with twists of wire. If the panel edges are sharpened into a real knife edge, it may get broken during the construction process and will easily be damaged when you bump a rock at sea. |  |
Stitching the seams
Drill small holes every 3-12 inches around the edges of the panels that make up the bottom of the hull. The distance between holes depends on the force required to bring the panels together at that point. In areas with a strong curve, or if you are using stiff plywood, you need more holes. Then drill corresponding holes in what will be the adjoining hull panels.
Put on gloves and use abrasive paper to roughen the parts of the panels you intend to tape. From now until you have taped the panels, wear gloves when handling them so that oil from your skin does not get onto the surface where it might reduce the strength of the bond between glassfiber and wood.
 When you have done this to each panel, place the two bottom panels of the hull together, face to face, and simply tie them together using individual twists of wire.
After taping one side of the hull seam you will remove the wire using wire cutters and taper-nosed pliers. Copper wire is best, because probably some twists will remain permanently embedded in the hull. We get our copper wire by stripping a short length of industrial copper cable and unwinding the strands. Some people report good results using very thin steel wire with a plastic coating, available from garden centers.
Some people prefer to use just a few twists of wire and do most of the stitching with continuous nylon monofilament fishing line. This has the advantage that when you have taped the inside of the seams, you can simply plane the outside of the seam flat before taping the outside.
The ends of the wire twists should be outside the hull. Don't tighten the wire too much, or it will damage the wood. Leave each twist slightly loose and use a screwdriver inside the hull to press the wire inside the hull down into the seam. That way, the wire inside will not leave big bubbles in your seam tape.
From being flat shapes on the floor, your panels now look like a kayak.
Taping the seams
 Using a roll of glassfiber tape, half a liter of resin (mixing up a little at a time) and a paint-brush, tape the inside of the hull joints.
Some say that only epoxy resin will stick well enough to wood, but we find that polyester resin is fine for taping.
Then attach the other two hull panels in the same way. When the resin has set, you can remove the ties and surplus resin from the outside of the seams and tape them too. You now have a watertight hull, so you are 15% of the way to having a finished kayak.
If you want a really tough kayak, cut out an extra set of plywood panels slightly smaller than the bottom hull panels and use epoxy resin to glue them inside the hull so that the bottom is 8 mm thick.
Fitting the deck
 From 4 mm or 6 mm plywood, cut out front and rear bulkheads and slip them into place. They will help the hull keep its shape until the deck is fitted, support the deck, and create buoyancy compartments to make your kayak safe.
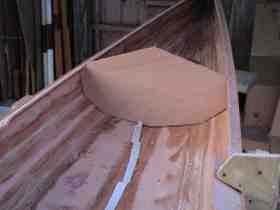
From solid wood, cut out some deck beams. These will go from one side of the hull to the other, to support the deck. You will probably need at least four deck beams. You will use two to support the back and front of the cockpit and the other two about 16 inches closer to the ends. If you are building a design with a small cockpit, the deck beam at the front of the cockpit will also be your knee brace, as in this photo of the masik in a skin-on-frame kayak. Notch the top edge of the deck beams so that they do not prevent you draining all water out of the cockpit when the kayak is upside down. Notch the inwales slightly so that you can slot the ends of the deck beams into the notches, and attach the beams with screws and glue.
Consider installing foam pillar buoyancy before you put the decks on. See Additional Flotation For Your Kayak.
Cut out the flat rear deck panel and the foredeck. The deck panel shapes will leave an egg-shaped hole for the cockpit. Attach the panels to the inwales and deck beams with pins, screws and glue. If you are making the decks from 3 mm or 4 mm plywood, consider cutting an extra panel to double their thickness around the cockpit. In particular, just behind the cockpit, where the rear deck will have to support your weight when you get in and out, and for 3 feet in front of the cockpit if the front deck may ever have to support the crushing weight of a flooded kayak during a TX-Rescue.
Use stainless steel (not brass) screws and waterproof adhesive to attach a pair wood strips, say 15 mm by 5 mm, along the outside of the top of the hull. These will protect the side panels against abrasion when the kayak is on the water alongside a dock.
Cockpit coaming, seat, etc
See Completing Your Wood Kayak.
Finishing
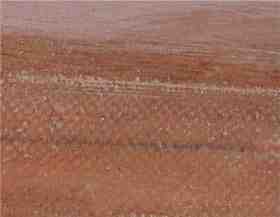
If you like getting up close to rocks, it may be worth sheathing the lower part of the hull with fiberglass to give it some protection against gouging and impact. You could put an extra layer of fiberglass under the hull, three feet fore and aft of the seat, because that is where most rock damage happens. This sort of sheathing is likely to add 11 or 12 lbs to the weight of the kayak, or 20 lbs if you also use epoxy resin to encapsulate all surfaces.
If you want a really tough, durable kayak and don't mind it weighing 55 lbs or thereabouts you can sheathe it entirely in fiberglass, including inside the bottom of the hull. See Sheathing & Painting.
Or build from a kit
You can buy a complete kit from the Internet including pre-cut plywood panels, copper wire, glass tape and resin, and a plastic seat. You will probably still have to bevel the edges of the panels, obtain materials for sheathing, deck rigging and hatches, and decide where to fit them. For contact details, see Retail Outlets.