Photo by Richard Best, kayaker unknown
![]()
Greenland-style paddles Make a Greenland paddle: — blade armor — wood — dimensions — tools & making — for more information Using a Greenland paddle Storm paddle The sliding stroke
European-style paddles Paddle Length Paddle Feathering / Off-Set Materials For Paddles Colors For Paddles Spare Paddle Paddle Float Sea Kayaking Technique
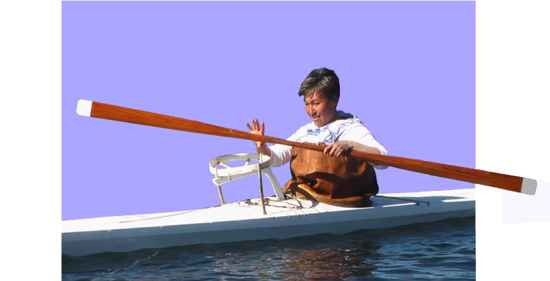 |
Photo by Richard Best, kayaker unknown
Paddles with big blades have never caught on in Greenland. More and more sea kayakers in North America and Europe are starting to use a Greenland paddle for touring, and keeping their big blade paddles for surfing, rock-hopping and white water.
Greenland paddles are slim. A one-piece paddle made of Sitka spruce or Western Red cedar can weigh as little as 750 grammes.
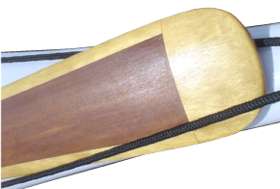 The shaft is shorter than that of a European-style paddle but you don't necessarily grip it with your hands closer together. See Using A Greenland Paddle. The blades are longer, narrower and not feathered, which makes them good in strong side winds on open water. The tips can be square or rounded. This one was made in Greenland, from a single plank with added blade armor. The plank looks exactly like Western Red Cedar but apparently it's Sitka spruce with woodstain.
You often hear it said that traditional Greenland paddles had to be narrow because they were made of driftwood, but it's just a nice bonus that you can make a paddle from a piece of driftwood. The Inuit had no trouble making umiak oars with big blades. True, they probably didn't acquire the hooked scarf joint technique until it was brought to Greenland by 11th century Viking settlers but they already had the mortice and tenon joint.
We're going to assume you know nothing about woodwork. With the simplest tools, in less than a day, you can shape a paddle from a single plank of a suitable wood. The right wood is light, tough, springy, straight-grained, free of knots, warm to the touch and almost unaffected by stress fatigue.
A one-piece paddle is quick to make and will be light but it will fray slightly at the edges and may crack at the tips. If it starts to look really worn you can get another plank and start again, or you can add blade armor. Traditionally, the tips and edges of the blade were armored with caps of bone or walrus ivory, which is very attractive and gave the owner something to do in the long Arctic winter evenings.
To attach paddle tips, cut an oblong peg (tenon) on the end of the wooden blade. Make a tip slightly larger than you need and cut a corresponding slot (mortice) in it. Traditionally, the tips were then secured by drilling a couple of holes through the blade, piercing both mortice and tenon, and inserting a couple of small wooden pins. It's better to glue the joint with a boatbuilding adhesive such as urea formaldehyde resin supplied as a powder which you mix with water. Trade names include Dural, Extramite and Polymite. Or there is polyurethane Gorilla Glue, or waterproof two-part epoxy adhesive. Quick-setting epoxies are often not waterproof. Ordinary polyvinyl acetate (PVA) wood glue may not work well even if it claims to be waterproof.
When the tip is securely attached, you can cut it down to size with a hand plane or belt-sander.
Any sort of dense hardwood such as oak, ash or yew makes good blade armor, especially if it has a tangled grain which will resist splitting. If you want the look of traditional ivory armor, you can make it from a hard-wearing plastic such as Corian.
 Wood
WoodYou can make a good Greenland paddle for the cost of a bottle of Scotch, out of a plank of anonymous softwood from a home improvement store. This is sometimes called deal, whitewood or SPF because the retailer doesn't know whether it is spruce, pine or fir. The density and therefore the weight and strength of softwood is highly variable depending on age, rainfall, nutrients, length of growing season and the sunshine and temperatures experienced by that particular tree. Sawmills sort all their wood into different grades so they can keep aside straight-grained, knot-free pine or fir and use it for high quality products. Any SPF that's good enough to make long, thin pieces of planed wood for joinery (say 12-foot lengths with a 5/8 inch by 2 inch cross-section) will be good enough to glue together into a blank for a very nice paddle.
If you want a truly great paddle, lighter and stronger than a good one, you can use a better species of wood:
• Sitka spruce (Picea sitchensis).A blond wood. Strong but quite light with a typical density of 425 kg/m3. The best is mostly from south-east Alaska and it's a great engineering material for yacht masts, prototype aircraft and light aircraft. We're told that no other species matches its strength-to-weight ratio. It's rated "not durable", but if you make sure it's protected by a good coat of varnish at all times to keep out the water, it'll last as long as you do.
• Douglas fir / Oregon pine (Pseudotsuga menziesii / Pseudotsuga taxifolia). Blond, sometimes reddish. With a typical density in the region of 550 kg/m3 this wood is significantly heavier than Sitka spruce and a lot heavier than cedar. Often has knots or resinous patches but "clear & better" Douglas fir can be very good.
• Western Red cedar (Thuja plicata). Dark red wood, typical density 350 kg/m3. Probably the most popular wood with those who make Greenland paddles at home. Also very popular with builders of strip-plank kayaks and canoes. Yacht builders use it like balsa, as a soft core material for hulls which will be sheathed both sides with layers of fiberglass. Strong for its weight, but surprisingly soft and brittle. So that a cedar paddle does not break in extreme conditions, it is often made slightly thicker than with other woods. If the ends are not capped with hardwood or plastic they will fray slightly in use.
There's probably a good lumber dealer in your area, or there are specialist firms who supply best-quality wood to builders of boats or light aircraft. See Retail Outlets.
Ideally you need a plank 9 cm wide, 4 cm thick and long enough for your paddle. A lumber dealer's stock is all cut to shape with a saw, and some of it is then planed smooth. If you ask for a piece of wood which is "9 cm by 4 cm sawn" it will be 9 cm by 4 cm. If you ask for a piece which is "9 cm by 4 cm planed" it may be only 8.6 cm by 3.6 cm.
Because the ends of a plank often split during drying, you probably need a plank 15 cm longer than your paddle. Sapwood (the outer part of the tree which is usually lighter in color) is usually less strong than the heartwood. You do not want your board to be on the boundary between sapwood and heartwood.
Looking at the length of the board, you want all the grain to run straight and parallel from one end of the board to the other. The opposite situation is called "grain runout". The bottom plank has the worst possible runout and is likely to break at the arrow.
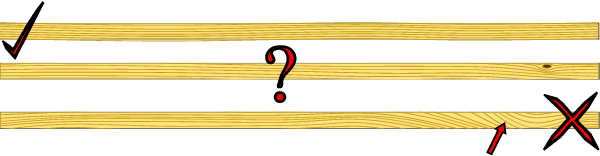
The middle plank has a knot at the edge. Knots are tight little swirls in the grain where a twig once grew. Live knots are just swirls in the grain at the root of a twig and small ones do not greatly affect the strength of the wood. Dead knots are usually larger and either dark themselves or surrounded by a dark ring. The dark part may just drop out, leaving a hole in your finished paddle. They exist where the twig was already independent of the main trunk, so the wood in the center of the knot is not structurally connected to the rest of the plank. A knot at the base of the blades may make the paddle snap, a knot near the end or edge of a blade is probably OK. Even with Western Red cedar, many planks will have a knot in an awkward place. If the lumber dealer will allow you to go through the whole rack looking for the best plank, you should be able to find a board with good grain. It is OK to have a few little knots at the edge of the blade, but you don't want any knots or runout where the greatest stress will exist, from the hand-grip to halfway along the blade.
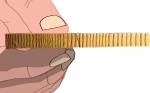 Looking at the cross-section of the board, ideally you want the grain to be perpendicular to the long axis ("vertical grain") but you're unlikely to find that at your local lumber dealer.
If you can't find a single really good plank, you can glue three or four narrower pieces together to make a blank.
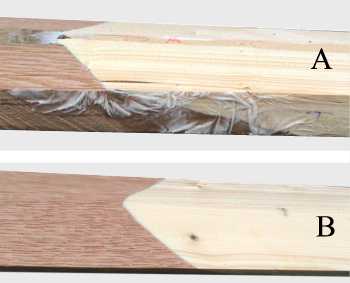 In the photos, A is one end of a blank, still covered in a crust of Polymite adhesive. It has a Sitka spruce shaft from a specialist supplier of wood for boatbuilders. The blades are made from some knotty SPF which was bought locally. The darker tips are of recycled oak. B shows the blank planed to shape except for the edges.
Making a laminated paddle is about five times as much work as sculpting a single plank. For best results it needs a hand plane a good 45 cm long, a flat and level work bench, many woodworking clamps and a high-performance waterproof adhesive, but it does make a stronger paddle.
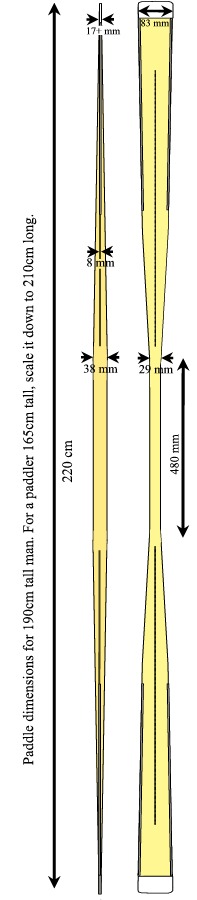
The paddle on the left is 220 cm long and would make a good first paddle for a tall man (I'm 6'3" / 190 cm tall). It has a similar blade area to a European paddle. Somebody 165 cm tall might prefer it 210 cm long, and might also want to scale down the other dimensions, giving a narrower shaft and blades to suit the size of their hands.
Too long will be awkward in strong winds. Too short or too narrow will make it difficult to do paddle brace strokes and support strokes, especially sculling for support.
The length of a paddle depends on your own height, arm length and hand size ("anthropometric dimensions"), and on the width of your kayak and personal taste. Most Inuit paddles in museum collections are thought to have belonged to men, and they tend to be 205 cm to 225 cm long.
One guideline is to make the paddle as long as your arm span plus the distance from elbow to wrist. Another is to stand with one arm raised vertically above your head and make the paddle as long as the distance from the ground to the middle joints of your fingers. A shorter paddler may want to add 10% to the guideline, and a taller paddler may want to make it as long as from the ground to the wrist joint of an upraised hand.
If you make an unarmoured paddle and decide it's a bit long, you can always cut a bit off the ends when you have used it enough to be confident when paddling, sculling for support and rolling.
2014 update from Sandy Ferguson of the Canterbury Sea Kayak Network in New Zealand (thanks, Sandy). He’s a very experienced 6 foot tall (183 cm) New Zealand paddler who recently took a break from paddling at home by doing a guided tour of the Queen Charlotte Islands in Canada. He used rented equipment, including a 240 cm paddle which was way too long. It nearly finished him off. To make things worse, he found that the guides themselves (some taller, some shorter) were using 210 cm paddles. When he got back home, he did a bit of checking around on the Internet and here are his main conclusions: “North American websites ... were all talking too long, recommending 230-240 cm. I used to use 220 cm Euro but went to Greenland paddles quite a few years ago and still use 220 cm or shorter. There are nine Greenland paddles in the garage. My partner uses 216 cm, could probably easily use shorter. I see you start off suggesting that 200 cm European paddles should/could fit most people and I applaud that. Your Greenland paddle sizing is, I think, a bit too big and I'd suggest 220 or less.”
Sandy was talking about an earlier version of this page which showed the length as 230cm for a tall man. I'm sure you're right, Sandy, and I've since changed the length on the diagram and in the text from 230cm to 220cm. Sandy's got some more paddle info on the Internet, for example here: https://canterburyseakayak.wordpress.com/greenland-paddle-make-your-own/ and here https://canterburyseakayak.wordpress.com/paddle-length-and-grip-width/
Let's turn from paddle length to blade width. The widest point of the blade is seldom less than 7.7 cm or more than 8.6 cm. 8.2 cm is typical. It depends on the size of the kayaker's hand. You should find it comfortable to grip the whole width of the blade, at its widest point, between the base of your thumb and the middle joints of your fingers when your hand is half-open in a C shape.
The blades are widest near the tip, and taper gently until they merge with the shaft. There may be a shoulder where the blade meets the shaft but never the obvious tube-meets-flat-blade shape of a European-style paddle, because that would prevent you sliding your hands from the shaft to the blade and back.
The shaft of a Greenland paddle is shorter and fatter than that of a European-style paddle, typically about 2 cm longer than the width of the kayaker's shoulders.
The cross-section of the shaft may be a square or diamond with rounded corners, or round or oval. Most home-builders seem to favor an oval shaft where the long axis is horizontal when the paddle is held with the blades vertical. This gives a comfortable grip and greatest strength during forward paddling. For a man's paddle the long axis might be 3.8 cm and the short axis might be 3.0 to 3.3 cm. That's bigger than the shaft diameter of a European-style paddle.
You can make a one-piece paddle with nothing more than a sharp knife like this kayaker in Greenland. Photo by Richard Best.

Most of us would need a pencil, a long ruler, three yards of thin string, small T-square, saw, a hand plane 13 inches or more long, a water-stone or equivalent to keep it sharp, some 200 grit abrasive paper and a workbench. A Workmate-type folding bench is very good because the two-part top will grip a tapering shape without damaging it. If you use a Workmate you will need something like a trestle or saw horse to support the other end of the paddle while you plane it. For a supplier of woodworking tools, see Retail Outlets.
You also need a paintbrush and either yacht varnish or an oil for finishing. See Protecting Your Wood Kayak.
First, use a very long ruler or a taut string to draw accurate centerlines from one end of the plank to the other, one on the top of the plank and one on the edge.
Then mark on the paddle shape. In the dimensions image above, the left view is the profile and the right is the plan. Lay the plank flat on your work surface, draw the plan view onto the top of it and use a saw to make a vertical cut from one end of the board to the other, cutting away the waste wood up to about 6 mm away from the pencil line. Do the same on the other side, and check that the centerlines are still straight. It may be that cutting away the waste wood released tensions within the board so that it is now slightly banana-shaped. You can stop and re-draw the lines before you remove any more wood.
Now use a sharp hand plane to remove more waste wood, up to 3 mm from the pencil line. For best results when making a long object like a paddle, use the longest hand plane you can get. At this stage, don't plane away the wood right up to the pencil line. A little waste wood will protect your paddle from damage which might otherwise be caused by the woodworking clamps with which you hold one end while shaping the other.
Turn the board on its side and mark the profile of your paddle. Where the blades join the shaft, the centerline is 38 mm thick. The centerline tapers in a straight line until 3 cm from the tip of the blade it is 20 mm thick for softwood or 16 mm thick for a hardwood such as ash. The profile is a set of straight lines. When you are planing the blades take good care not to make the surface of the blades concave or you may end up with a "suicide paddle". Remove the waste wood as before.
You are now ready for final shaping. The thickness of the blades tapers from 38 mm at the base to 16-20 mm by the tip. The cross-section of the blades is a flattened oval at the tip of the blade, diamond-shaped in the center of the blade, and then merges into the shaft. For the entire length of the blades, the wood 1 cm in from the edge of the blades will be at least 8 mm thick. So keep the board standing on its side and draw two lines on each side, 8 mm apart and parallel, to represent the width of the edge. Then plane away waste wood in a straight line from the edge of the blade to the centerline. Use a long hand plane and sharpen the blade from time to time.
Your paddle is nearly complete. Add wood or bone armor if you want. Otherwise, shape the edges and tips according to taste. If the edges are too sharp they will get damaged when the paddle hits rocks, if they're too round the blades may flutter. Many feel that the best cross-sectional shape for blade edges is a pointed arch, in other words quite a sharp edge.
After sanding the whole thing smooth you could finish the paddle with yacht varnish to bring out the beauty of the wood, or paint it. See Protecting Your Wood Kayak. Many experienced kayakers prefer a traditional matt finish such as Danish oil, which is tung oil with added dryers and a UV filter. Oil finishes are much faster, easier and cheaper than varnish. They also give a less slippery grip and are less likely to cause blisters.
Wooden paddles shouldn't be stored anywhere really hot and dry, and (like plastic composite paddles) they may slowly warp if they're stored horizontally and only supported by the ends.
There's more on the excellent website of Qajaq USA, especially the article by Chuck Holst at www.qajaqusa.org/QK/makegreen2.pdf
You can buy a 48-page book on paddle construction. Greenland Paddles Step By Step, 2009, Bryan Nystrom. More information from www.greenlandpaddlebook.com
"When you are paddling a kayak, you keep on passing the paddle to and fro in your hands so that as much of the blade as possible is under water at each stroke".
F Spencer Chapman, Watkins' Last Expedition, 1934
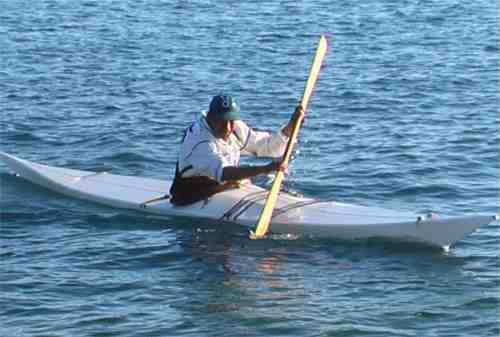 The blade of a Greenland paddle is narrow enough for you to grasp its whole width in your hand. The shaft is shorter than the shaft of a European-style paddle, but that does not necessarily mean you hold it with your hands closer together. Some people do, others hold a Greenland paddle with their hands about the usual distance apart by grasping it at the base of the blades. See for example the Greenlandic kayaker in this photo by Richard Best.
We look at general paddling technique, body rotation and so on elsewhere. If you're converting from a European-style paddle to Greenland style, you could try this. Hold it a little lower and closer to your lap, take slightly shorter strokes, and maybe use a slightly faster paddling cadence. The lower paddle angle is comfortable for cruising and means that you get closer to wildlife before it sees you coming.
A Greenland paddle is not feathered so the basic paddling position is with the shaft horizontal and the blades vertical. But not absolutely vertical - leaning slightly forward. When you paddle forwards, every time a blade enters the water its upper edge is a little further forward than the lower edge. That way you avoid drawing air down into the water. Less turbulence, more power where you want it, silent paddling. If you use too much angle the blade will dive deeper than you want.
Maintain the slight forward angle all the way to the end of the stroke, and then take the blade out of the water by slicing it up in the direction of the blade angle. The blade will leave the water as it entered it, cleanly and with minimum splashing.
With a European-style paddle you nearly always grip the shaft in the same two places. Most of the time that is what you do with a Greenland paddle too, but you can hold a Greenland paddle anyplace along the shaft or blades. It is easy to hold it closer to one end than the other, which gives more leverage for sweep strokes, support strokes and kayak rolling. In a side wind you can resist the kayak's tendency to turn upwind by paddling with one side of the paddle longer than the other. See Coping With Wind From The Side. The shape of the Greenland paddle also enables you to use the "sliding stroke" below.
With the sliding stroke you can use a shorter version of the Greenland paddle as your spare paddle.
A Greenland storm paddle has about the same blade dimensions as a main paddle but the shaft is shorter, just long enough to grasp with both hands side by side. Say 90 mm to 160 mm, bearing in mind that each hand will overlap a little onto the root of the blade. This makes it possible to carry a storm paddle on the front deck of your kayak in one piece, where you can easily reach it and roll up if you drop or break your main paddle.
When using a Greenland paddle in high winds, with a sliding stroke you can keep more of your active blade in the water and less of the other blade up catching the wind.
It means moving your hands along the paddle shaft and sliding one of them out some distance along the blade with every forward paddling stroke. The distance you move your hands depends what you are trying to achieve at the time.
We're going to start with a paddle stroke on the right. Hold your paddle in the usual way, grasping it where the blades meet the shaft. Loosen the grip of your left hand. Reach forward with your right hand grasping the paddle, but leave your left hand where it is. The left blade slides through your left hand as if you were drawing a sword from a scabbard. When half the left blade has slid through, grasp it with your left hand, slide your right hand back an equivalent distance, to about the middle of the shaft, and take a forward paddle stroke on the right.
At the end of the stroke, slide your left hand towards your right, grasp the shaft, loosen the grip of your right hand and "draw the sword from the scabbard" the opposite way. Take a forward paddle stroke on the left.
The sliding stroke can be exaggerated in windy conditions so as to keep more of the paddle in the water and less of it catching the wind. The thumb of the hand closest to the active blade may be next to the center of the shaft, and the other hand near or at the end of the other blade. Which is why a Greenland storm paddle has a shaft just long enough to grip with one hand, or two hands side by side. Every time you take a stroke, one hand is on the grip and the other is near the furthest end of the opposite blade.
Go to next page for:
• Clothing & Tow-Belt