Fiber-Reinforced Plastic (FRP)
 If you make strands of glass thinner than a human hair, they are so flexible you can tie a knot in them, or spin them into thread or rovings. If you make the strands or rovings into a mat or cloth, use it to line a mold, saturate it in plastic resin and wait for the resin to set solid, you have a very light, strong, durable engineering material which is quick and easy to use.
Basic laminates may be called fiberglass, glassfiber, glass-reinforced plastic (GRP), fiber-reinforced plastic (FRP), or just composite. The resin is usually polyester. More exotic laminates may be made with different resins (vinylester or epoxy), with non-glass reinforcements such as diolen (polyester), kevlar (aramid), carbon fiber ("graphite"), and with various core materials. None of these is good for the environment but a new range of biocomposites is arriving now.
Whatever you call it, FRP is a long-established way of making a reasonably light, rigid, tough, glossy, repairable kayak. We discussed the factors for and against at Fiberglass, Kevlar & Similar Composites.
The manufacturer's art is to place reinforcement so as to make the kayak light but still strong enough. The operator's skill is to wet it out with the minimum resin. In the past, many experiments aimed at building a lighter kayak have ended with a crunch. See A Kayak Must Be Light and But Not Too Light. On the other hand, plenty of sea kayaks made with a very basic fiberglass construction have been in regular weekly use for thirty or forty years. If they get very rough treatment they may have had numerous repairs, but it is fairly quick and easy for a kayaker to make a strong and cosmetically-acceptable repair to his or her FRP boat.
Most sea kayak manufacturers still use fiberglass and quite a few still use the basic 1970s technique and layup schedule, so we will describe it.
Fiberglass kayaks are made by hand, in a three-part mold (hull, deck and cockpit coaming / seat) with a rough exterior and a perfectly smooth interior. It takes an operator about one working day to build one kayak.
The first stage is to wax-polish the inside of the mold and apply a thin layer of release agent so that the new kayak will not stick to the mold. Then the operator brushes or sprays liquid gelcoat resin onto the inside of the mold. This will be a skin of smooth, glossy, shiny, waterproof plastic on the outside of the finished kayak. It can be turned any color you like, opaque, translucent or metallic, by adding pigment to the liquid resin.
With a workshop temperature of 20 degrees, the gelcoat resin will soon start to go rubbery and will feel hard within 30 minutes. This is known as curing. Technically, the molecules of the resin are starting to cross-link. The gelcoat layer must be about 0.6 mm thick. Any thicker and it will tend to crack when the kayak hits anything. Much thinner and it will stay rubbery forever because the styrene in the resin evaporates before the gelcoat has time to cure.This can also happen if the workshop is drafty or a hot-air blower is directed at the mold.
When the gelcoat has cured sufficiently, on top goes the first layer of glassfiber reinforcement, cut approximately to shape with scissors.
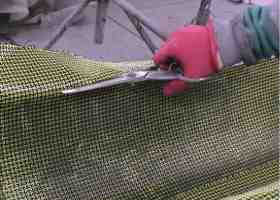
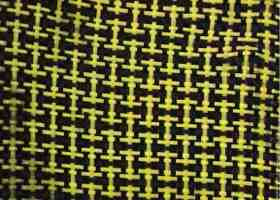
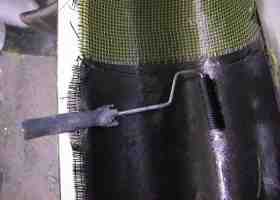
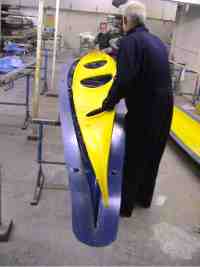
Most of the photos in this section were taken at the factory of Kirton Kayaks in Devon, England. Since 1966, Kirton have been making excellent race kayaks and sea kayaks using a wide range of layup techniques, which currently goes from "economy" (any color you like, as long as it's white) through foam core Kevlar with two stages of vacuum bagging, up to vac-bagged Nomex core carbon fiber. The first five photos on this page show the construction of a race kayak with a yellow and black kevlar-carbon cloth, polyester resin, and local reinforcement of pure black carbon fiber.
Manufacturers usually make sea kayaks from inexpensive E-glass, which is sold in various forms. The glass layer touching the gelcoat is often a full-width, full length layer of 450 gm/m2 chopped strand mat. CSM is a rough mat which absorbs a lot of resin and is not very strong, but it has its uses. See Reinforcements. On top the manufacturer puts a full-width, full length layer of 300 gm/m2 woven rovings (a coarse cloth woven from glass thread). To consolidate these layers into a solid laminate, the manufacturer saturates them with about 7 kg of layup resin for the hull and 4 kg for the deck.
The operators use brushes and rollers to spread the resin, thoroughly wet the reinforcement, and squeeze all the air bubbles out of it. If an inexperienced operator tries to wet out two layers at the same time (s)he may leave bubbles, or even dry patches which will be a serious weakness in the finished kayak.
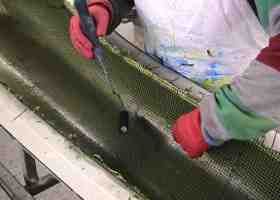
This is often a two-person job, because it has to be completed before the resin starts to get rubbery (or "go off") and a single operator may not be fast enough.

While the first layer of the laminate is hard but is still in the process of curing, a further 6 kg of layup resin is used to laminate extra layers of CSM and woven rovings along the centerline of the hull and the centerline of the deck, with more as local reinforcement around the rim of the cockpit and other places that need extra strength. If each layer is added while the previous one is still curing, the new layer will cross-link to the old.
Different manufacturers used different combinations of CSM, woven rovings and other kinds of glass. The recipe for any particular boat is known as the layup schedule. Four thin layers can make a lighter, stronger laminate than two thick ones, but this is considerably more work for the operators. The hull of any boat is usually made stronger than the deck. The hulls of GRP "squirt boats" in the USA are often made with nine thin layers of reinforcement, for hard use in rocky rivers. The result is super tough but too heavy for a sea kayak.
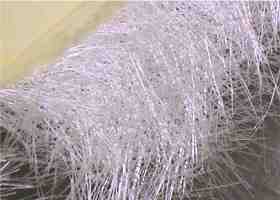
For a really strong hull for a sea kayak, start with gelcoat, then use a full layer of 300 g/m2 CSM, then a full layer of 300 g/m2 woven rovings, then another full layer of CSM and another full layer of woven rovings, plus local reinforcement in the form of a 6 feet by 16 in patch of woven rovings under the cockpit and a full-length keel strip, 2 in wide, of 450 g/m2 CSM. Instead of the keel strip, Sisson Kayaks in New Zealand use a full-length skein of 23000 glass fiber rovings, doubled to 46000 in the ends, which the boss says "lays a crossbow spring into every kayak keel... because of this I am happy to do the hammer test on my demo boats". We'd like to watch.
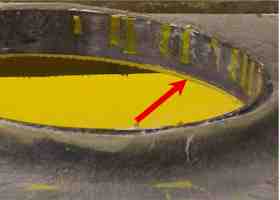
The photo above is of the deck of a yellow sea kayak, nearly ready for release from a dark gray mold. The operator has just used a sharp knife to cut away the shaggy edges of the deck, leaving a perfectly round hole for a hatch. There is a point (the "green" stage) when the hull and deck are like toffee - soft enough to cut with a sharp knife but hard enough not to disintegrate. This gives the operator a few minutes to trim the shaggy edges off the entire molding and around the holes for hatches and cockpit.
The hull and deck are weak and floppy until they are joined together. The deck molding in particular must be handled carefully if removed from the mold for inspection.
Certain things can be fitted while the kayak is still in two halves. Footrest mountings, pillar buoyancy and a skeg box can easily be fitted inside the hull at this stage.
To bond the hull and deck together, usually the operator breaks the adhesion between molding and mold (not always easy to do without damaging one or the other) but does not actually remove the moldings. The hull and deck molds are both made with a flange so that they can be bolted together in exactly the right alignment.
The operator bolts them together with the hull and deck moldings still inside, and then bonds the moldings together by laying up strips of fiberglass tape, 3 inches wide, along the inside of the hull-deck seam and saturating them with resin. Again, this should be done while both halves of the kayak are still curing, so that the resin in the seam cross-links to the hull and deck moldings.
 For the operator, making the hull-deck joint is pretty grim work. He has to have one arm inside the kayak while he uses a resin-soaked brush wired onto the end of a stick to persuade the glassfiber tape to stick properly to a narrow seam, not to mention squeezing out all the air bubbles. He starts off doing the ends, and to reach that far he has to put his head inside the kayak. Any fiberglass workshop is heated and the air smells strongly of solvents such as styrene and acetone. Inside a curing kayak, the air is hot and laden with styrene. There are tricks he can use to reduce the time he spends with his head in there, in particular fixing the dry fiberglass tape in place with tiny dabs of hot glue before putting hull and deck together.
Then the deck mold is taken off and the cockpit coaming is attached to the deck. The coaming is the rim onto which you fix your sprayskirt. It is made using a separate mold which often incorporates a suspended bucket seat. After being removed from its mold, it is bonded to the deck with a mess of resin and glass strands.
Next the kayak is removed from the hull mold and stood on each end in turn so that a thick dollop of resin and loose strands can be dropped in, creating a solid plug in the end. This dollop must not be too big, or it will get very hot while curing. The existence of these end plugs means that a hole can later be drilled through each end to attach end loops. The end plugs also make the tips of the kayak tough enough to crash into solid objects without too much damage.
Then the kayak can be fitted out. Bulkheads are added behind the seat and in front of the footrest. Finally, hatches, deck rigging and other accessories are installed, using adhesive, bolts and rivets.
Since the 1970s, a few refinements have been introduced. Some kayaks include Kevlar for extra toughness, and most manufacturers now make an improved hull-deck joint by laminating fiberglass tape 3/8" wide along the outside of the hull-deck seam after the kayak has been removed from the mold. But most still use polyester resin and basic E-glass reinforcement in the form of CSM and woven rovings. These are the workhorses of the marine industry, used for kayaks, sailboats and minesweepers alike.
Some manufacturers now use more exotic reinforcements and resins which produce somewhat better results for a higher price. These exotics are seldom used to make a super-strong 24 kg (53 lb) kayak. Instead, they are used to make a 19 kg or 20 kg (44 lb) kayak which is as strong as the ordinary 24 kg version.
Kayaks made with complex layup schedules, exotic materials and vacuum bagging may cost twice or three times the price of a basic construction. So the owner is not going to be happy if it hits a rock, or falls off the roof rack because he forgot to tie it down. If, like some of us, you have spent more than thirty years happily using kayaks laminated by hand with polyester resin and a basic mix of E-glass reinforcements, you probably you won't feel any burning need to try the exotic. At least, not until you get old and creaky.
Resins
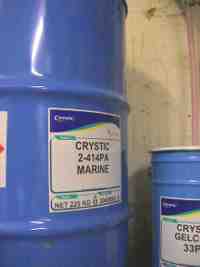
Many companies make polyester resins of variable quality. The kayak manufacturers we know use Scott Bader's Crystic products because of their consistent high quality.
 Marine-grade polyester resin is easy to use, highly UV resistant, waterproof, not too expensive, and not too harmful or unpleasant for the operator. In liquid form it contains a lot of volatile solvent, styrene, which evaporates while the resin is hardening. Styrene is a moderate health hazard so the workplace needs to be well ventilated. It dissolves polystyrene.
Like most plastic resins, polyester creates heat while setting, in what is called an exothermic reaction. If you leave a deep puddle of surplus resin in a mixing pot it will start to crackle and smoke as it cures.
It is important to use only the minimum amount of resin necessary to "wet out" the reinforcement. Any more resin adds weight without strength. The trick is to pour on just the right amount of resin and make quick use of brushes and metal rollers to get all the reinforcement wet before the resin goes rubbery. Inexperienced workers sometimes leave air bubbles in the laminate, or even dry patches with no strength at all. The glossy exterior of the finished kayak gives no hint that a fist-sized hole may be waiting to open up.
Until it has fully cured, a new kayak should not be allowed to get wet or chilled below freezing, as this will stop the cross-linking process before the resin has reached full strength. Most resins feel hard after thirty minutes but a new kayak may still be soft enough 24 hours later to get permanently dented if left to stand on trestles which are not properly padded. A new kayak may take up to a month to cure completely. This process can be speeded up if a new kayak is "post-cured" by leaving it to bake overnight in a very hot room. This is an advantage for the manufacturer rather than the kayaker.
The more exotic vinylester or epoxy resins are much more expensive than polyester, and also less tolerant of variations in temperature and humidity in the workshop. They are more irritant, more allergenic and more carcinogenic than polyester resin. However they stick one layer of a laminate to another more effectively. It is often possible to peel apart, by hand, two layers of woven reinforcement if they are held together with polyester resin. You can't do that if the two layers were laminated together with vinylester or epoxy resin.
Epoxy resin is eight times stronger in tension than polyester, and that makes a difference to the impact strength of a laminate. However it doesn't mean that a kayak is eight times stronger if made with epoxy resin. Or even twice as strong. Epoxy is better than polyester at sticking to things, so many people use it when carrying out repairs to existing kayaks and for sheathing wooden kayaks. Epoxy resin is more hazardous to the health of the operator and it degrades if not protected from sunlight, becoming milky or yellow and starting to crack up. To shield it from the sun, a manufacturer will probably apply an opaque polyester gelcoat as the kayak's outer skin.
Although vinylester and epoxy resins can produce a slightly stronger or lighter laminate, few sea kayak manufacturers use them except for vacuum-bagged boats.
Some FRP manufacturers use vacuum-bagging to do more saturation with less resin. When the reinforcement in one half of the kayak mold has been wetted with resin, they put the half mold into a large plastic bag. Before the resin has time to set, the air is sucked out of the bag. Atmospheric pressure of up to 1 bar (14 pounds per square inch) squashes the resin and cloth onto the mold, ensuring that the laminate is properly consolidated. A vacuum-bagged kayak can be made with a little less resin. Because it takes time to set up a kayak for vacuum-bagging, it is very difficult to do it in the few minutes for which polyester resin remains liquid. Most vacuum-bagged kayaks are therefore made using epoxy resin.
A few kayak manufacturers go even further down the high-tech road and use vacuum resin infusion, putting the reinforcement in the mold, putting the mold in a vacuum bag, sucking out the air with a powerful pump and then allowing the resin to infuse through tubes.
Where money is no object, a manufacturer may save more resin by buying reinforcement which is already saturated ("pre-impregnated") with the right amount of resin. Pre-preg has to be stored in a fridge and may have to be baked in an oven. It is more often used in the aerospace industry than by kayak builders.
Reinforcements
 Chopped strand mat is a cheap reinforcement, made of short, very thin strands of glass held together with a saline binder which dissolves in polyester resin. It is easy to use because once the binder dissolves, the mat bends easily round sharp corners.
A layer of thin CSM is used between the gel coat and any coarse-weave fabric so that the pattern of the woven fabric does not "print through" into the gelcoat. You want your gelcoat smooth, not textured. CSM is also better than woven materials at sticking to adjoining layers within the laminate, but it is weaker than other forms of glass, and it soaks up a lot of resin.
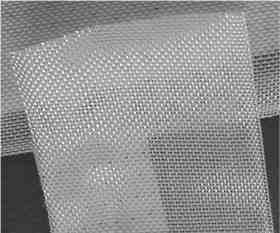
Woven glass fabrics produce a much stronger laminate than CSM. If made with a close, flat weave, they have the additional advantage that once they have been wetted out with resin, you can use a polythene squeegee to scrape off surplus resin before it sets. Woven fabrics are not the strongest possible reinforcement because each time one strand of a glass cloth crosses over another there is a small concentration of stress which reduces the strength of the laminate.
A non-woven textile makes a stronger and stiffer laminate for the same weight. Long strands of glass are laid down parallel to each other, with another layer on top at a different angle ("biaxial", "double bias", "triaxial"). The layers are stitched together so that the cloth does not fall apart before the resin has set. This sort of reinforcement is not often used for kayaks.
Ordinary E-glass, in the form of CSM and woven rovings, is all you really need to make an ordinary sea kayak. A few sea kayaks are made with a considerably stronger and stiffer form of glassfiber known as S-glass, and some are made with Kevlar and carbon fiber (sometimes called graphite although strictly speaking, graphite is the form of carbon you'd find in a schoolchild's pencil. Wikipedia says "the atomic structure of carbon fiber is similar to that of graphite... The difference lies in the way these sheets interlock... giving graphite its soft and brittle characteristics").
A sea kayak may include some Kevlar and/or some carbon, or be made entirely from Kevlar-carbon like the race boat in the photos above. The reinforcement cloth is woven of contrasting strands of black carbon fiber and golden-yellow Kevlar. It could be used to make a super-tough 24 kg (53 lbs) kayak but is generally used to produce a light kayak, say 18 kg (40 lbs), or a kayak which is a little lighter and a little tougher than average, say 21 kg. We mentioned Paul Caffyn's comments about the 13 kg (27 lb) kevlar-Coremat-carbon kayak which took him solo round Japan and survived many subsequent day trips. In general, ultra-light construction is not a recipe for long life. If your kayaking involves surf, rocks and caves you may prefer a heavier boat in a basic construction.
Carbon fiber has extremely high tensile strength. By including some within a fiberglass laminate, a manufacturer can make a kayak very light and stiff. The more carbon he uses, the stiffer the laminate will be. An eggshell is very light and stiff, but it is not a tough structure. Carbon fiber laminates are remarkably strong for their weight, but you may punch a big hole in a lightweight carbon fiber kayak if you drop it onto a rock. The front of such a kayak may snap right off if it "pearl dives" into the sand while you are surfing down a steep wave. Weight for weight, an ordinary fiberglass laminate has about four times the impact resistance of one of pure carbon fiber. In contact with salt water, carbon fiber may corrode aluminum fittings such as rivets, by galvanic action.
Kevlar is a more attractive material for a sea kayak. Used in some kayaks since about 1973, it is very tough. On impact with a rock, a Kevlar laminate can bend and recover without damage. Compared to glass, it needs less resin. Because Kevlar is strong in tension but not in compression, it will best resist impact with rocks if used as the inside layer of the laminate, the one you see when you look in the cockpit. Kayaks made with polyester resin and two adjoining layers of Kevlar may start to delaminate after repeated impacts. Solutions are to put a layer of glass next to the Kevlar, or use epoxy resin.
Kevlar-carbon cloth is often shown off under a transparent finish because it looks nice and is a status symbol. However Kevlar degrades if exposed to direct sun. In countries with high UV levels, a Kevlar laminate left outdoors in midsummer can lose a quarter of its strength in three weeks, and can ultimately lose more than half its strength. It should be protected from sunlight, which usually means covering it with an opaque layer of gelcoat or paint.
Apart from its structural qualities, a Kevlar laminate is highly abrasion-resistant. Kevlar felt makes a tough "skid plate" if laminated onto the outside of the keel using epoxy resin.
Diolen is a trade name for polyester cloth reinforcement with properties about halfway between glass and Kevlar. It has been described as "poor man's Kevlar". It is used in the same way, as the inside layer of the laminate, and has similar properties.
Sandwich construction
A lot of kayaks have some sandwich construction to create shallow ridges where extra stiffness is useful, such as on the hull beneath the seat and on the underside of the foredeck. A few composite manufacturers use it extensively, inserting a lightweight core into the laminate between two layers of reinforcement all over the boat. One possible core material is a layer of plastic foam 1 mm-2 mm thick, made so that it will not absorb resin but with enough holes to let the inner and outer layers of laminate bond to each other. A foam core makes the laminate thicker and therefore stiffer, but may not make it any stronger.
If the core material itself has some strength, the laminate will be both thicker and stronger. A thin layer of wood makes an excellent core, hence its use as the core material for prototype ocean racing yachts. Many kayak home builders use it in this way, making a wooden sea kayak and sheathing it with FRP inside and out.
Obviously, covering a mold with a thin layer of wood takes a lot of time so manufacturers prefer flexible core materials such as polyester felt. This looks and feels like thick blotting paper, and drapes quite nicely onto a mold. To make it absorb less resin, it may contain tiny plastic bubbles (microspheres). Examples are Coremat and Spheretex. They add stiffness but not much strength. Racing kayaks and light aircraft are sometimes made with a synthetic honeycomb core which adds both stiffness and strength. And serious expense.
Imported kayaks
Composite kayaks are laminated by hand, so a large part of the cost is labor. Many (most?) composite sea kayaks are now made where labor is cheap, which usually means China, Thailand and Eastern Europe. There's not much sign yet that the savings are being passed on to the consumer, which does at least mean that small North American workshops can still compete with the big boys.
Most manufacturers who shift production overseas initially encounter major problems with quality control. Several Czech manufacturers have thirty years experience of making strong, lightweight composites but this is still new technology for many eager factories in China and Thailand. The Far East also has the problem of sub-standard materials (resin brewed up in somebody's garage, reinforcement diverted from other industries). There is a real possibility of a major defect hidden under the glossy surface. Sloppy manufacturing can mean that the kayak weighs a lot more than advertised; or does not have enough glassfiber for strength; or leaks along the hull-deck seam, round the cockpit or at deck fittings; or has invisible weaknesses in the hull where the glass reinforcement was not properly wetted-out. It has been known for a nice-looking sea kayak to have a weak patch you can put your fist through.
Cosmetic bubbles may appear on the surface when the kayak sits in direct sunlight. This can happen if the rolls of reinforcing fabric were stored in a damp place, so when the kayak was built, moisture was sealed inside the laminate. It turns to vapor on a hot day, and the gelcoat bubbles up.
A manufacturer must either spend a lot of time at the plant, and visit the materials suppliers, or do like Epic Kayaks and set up their own factory. Apparently it's in Huanghzhou, uses the latest technology, Scott Bader resins and has stringent quality control.
Biocomposites
There are green alternatives to oil-derived polyester resin and fiberglass reinforcement, and some manufacturers are now using them for surf boards and kayaks.
Wikipedia says that biocomposites are "characterised by the facts that the petrochemical resin is replaced by a vegetable or animal resin, and/or the [reinforcement such as fiberglass or carbon fiber]... is replaced by natural fiber."
Resins can be made from plant material including sugar, starch and linseed oil. Reinforcements can be made from flax (so you can get your whole kayak from one plant species), hemp, sisal, jute, bamboo or wood fibers.
Manufacturers are getting interested in sustainable composites anyway, because of the increasing cost of petrochemical products and transport. No doubt the trend will accelerate when consumers start asking for them. Some surfboard manufacturers already make eco boards using sugar-based epoxy resin and reinforcement woven from bamboo. See www.greenlightsurfsupply.com. However surfers expect to replace their boards fairly often, whatever they're made of. Sea kayakers want to know that their expensive investment will last, and that means serious research.
The two big French manufacturers of sea kayaks, Plasmor and Polyform, are both interested in biocomposites. Plasmor is a partner in the Université de Bretagne-Sud's NavEcoMat project, which is all about biocomposites for small leisure craft.
In the UK, the University of Wales in Bangor has set up a BioComposites center. The University of Plymouth also has an interest in the subject and has put some useful information online. See www.tech.plym.ac.uk/sme/MATS324/MATS324A9%20SusComp.htm.
A little further west, the Cornish surfboard/marine products manufacturer Movevirgo has set up a research & development arm, Sustainable Composites. They are working with the Combined Universities of Cornwall to develop marine craft, and have built an eco surfboard for the Eden Project with a balsa core and a hemp skin. Norman Frost of SC tells us "I have been using a 9' surfboard we built here as a test bed for two and a half years now and it is standing up well. The resin has a greater elongation to break than polyester and will therefore deform further before cracking - useful when sliding over weirs!"
SC retails a laminating resin made from linseed oil, which is cured by ultraviolet light from UV suntan tubes, and reinforcements made from hemp in the form of both mat and cloth.
2016 update: Super Sap epoxies from Entropy Resins are the first epoxy to be awarded USDA BioPreferred certification. Entropy say that the range is not made from petroleum-based carbon but from "plant-based carbon. The raw materials going into our resins are co-products or waste products of other industrially important processes". www.entropyresins.com
Build your own kayak in fiber-reinforced plastic
Most home builders opt for plywood, skin-on-frame or strip-plank but back in the 1970s a lot of ordinary kayakers built their own in fiberglass, using materials and copyright-free kayak molds supplied by specialist companies such as Trylon and Strand Glass. It is easy as long as you have a heated, ventilated room in which you can make a sticky, dusty mess. For a generation of sea kayakers, the pungent smell of polyester resin evokes their youth, the way the reek of the stable-yard makes retired show-jumpers go all nostalgic.
If you build a single sea kayak in fiberglass, you save about 75% of the cost of buying a new fiberglass kayak from a manufacturer but you may find it is cheaper to buy a second-hand boat. The cost savings are much greater if you buy materials in bulk. If you and your friends want to make ten kayaks, you can buy a big industrial drum of resin, and big rolls of mat and cloth, and make them very economically.
The materials (mold wax, resins, reinforcements, solvents, safety, cleaning and mixing equipment) and tools (brushers, rollers, knives and abrasives) are all available. See Retail Outlets. For more about the technique, see Fiber-Reinforced Plastic (FRP), above. Many of today's manufacturers learned their trade from two books by Alan Byde. They are long out of print but still available secondhand:
- Canoe Building In Glass-Reinforced Plastic, A&C Black, 1974 (a workshop manual)
- Canoe Design & Construction, Pelham Books 1975 (part technical, part reminiscence, part philosophical)
If you have access to a suitable mold
A lot of kayak clubs still have a dusty old mold which just need polishing. Some are for respectable copyright-free sea kayak designs . In the UK, for example, there was the Sea King from Trylon, a pretty nice boat like the classic Anas Acuta. Trylon also did one called the Seahawk, which looked a bit unusual but performed well at sea. A lot of molds were unauthorized copies of commercially-made 1970s kayaks like McNulty's Huntsman or the Anas Acuta itself.
No mold, but you want a hard-chine GRP kayak
There are some very nice designs for sea kayaks that you can make from plywood panels. This technique is called "tack and tape" or "stitch and glue". It's fast, it's easy, and it makes light, strong, good-looking boats. See Building In Wood - Plywood. However, if your kayak may have to spend a lot of time outdoors in sun, rain, snow and frost, after a few years you'll find that fiberglass is more durable.
Any shape you can make in plywood you can make in fiberglass.
To make fiberglass panels, you'll need a dry, well-ventilated working area that you can heat to room temperature, and where you can make a lot of mess. With practice you can work clean, and the new generation of polyester and epoxy resins have only a fraction of the powerful smell, but the process is still not one to carry out in the family living room, or anywhere near a carpeted floor.
You'll need a smooth, flat work surface* slightly larger than the panels you want to make. Mark out the shape of your panels on the work surface, cut out pieces of fiberglass mat and cloth to cover the entire panel plus half an inch or so all round, apply a thin layer of colored gelcoat, let it set, and then lay on your first layer of fiberglass and impregnate it with laminating resin using a special roller. The resin and the fiberglass will combine to form a fiberglass / GRP / FRPpanel.
After trimming the panels to the EXACT shape required, just stitch and tape the seams as with a plywood kayak. Use epoxy resin and glass tape.
As well as sea kayaks, this method has been used to build prototype racing sailboats and powerboats. For example Kali, the gas-turbine powered RIB (rigid inflatable boat) built by Simon Sanderson, record-breaking windsurfer, recumbent cyclist and speed sailor, for Jon Aldiss to helm in the Round Britain race 2004 and 2007. See www.rib-kali.com
1) You can make a smooth work surface out of Melamine-faced board. If you prepare it with mold release wax, your fiberglass composite will have a perfectly smooth surface and won't stick to the Melamine. Mark out the shape of the panel you want to produce. Then apply gelcoat, glass reinforcement and polyester resin onto it as if it were any other mold.
2) Alternatively, you can make a smooth work surface from ordinary plywood sheets, then cut some "polyester release film" (Type A Mylar, or Melinex) from a roll and lay it on the plywood. When the laminate is hard, peel off the release film to leave a perfectly smooth surface.
No mold, but you want a round-bilge GRP kayak
It is fairly easy to take a fiberglass mold from a kayak which already exists. Unless that kayak is free of copyright because it was always intended for home-building, you will be stealing the designer's expertise, inspiration and hard work. Copying a kayak requires you to partly dismantle the original kayak, cutting off the cockpit coaming, hatch rims and all accessories, grinding off any external seam, ensuring that the surface is perfect and then drilling many holes in it to attach a flange mold. It is not worth doing unless you are making at least five kayaks.
To start from zero and make a prototype, a plug and a mold really is a lot of work. It could take you six months. Unless you happen to be a professional mold-maker and like taking your work home, it is worth doing only if you want to build at least a dozen kayaks. If you put any value on your labor, it is worth doing only if you want to built at least two dozen kayaks.
First make a prototype. If you want a hard-chine hull shape you can easily make a disposable prototype with a wood frame and a skin of plastic sheet to see if you like way it performs on the water. If you use Clingfilm / Saran Wrap, you should get 5 minutes before it sinks. Alternatively, for a little more work or expense you could make a proper skin-on-frame prototype and test it every weekend for years. See Build Your Own Skin-On-Frame Kayak.
If you want a rounded hull shape, the easiest way to make a prototype is by carving a solid kayak out of plastic foam. Polyurethane foam has to be shaped with a saw and abrasives but can be covered with polyester resin for long-term testing. Polystyrene foam is very easy to carve without mess using a hot wire cutter consisting of 30 inches of thin wire stretched between the arms of a wooden frame (like a bow saw) and heated by passing a 12 volt DC current through it at no more than 2 amps. A car battery would be fine. Apparently you can make the hot wire itself from either 0.010 inch stainless steel picture hangar wire or #26 AWG nichrome wire. You can also use the wire to scoop out a cockpit in a few minutes. That is a long, dusty job if you used polyurethane foam. If you make your prototype from polystyrene foam and want to cover it with fiberglass you would have to use epoxy resin, because polyester resin would melt it instantly.
Make a plug
If you like the looks and performance of your design, and you are willing to spend three to six months of your time, the next stage is to make your own plug from wood and other material. Then you take a fiberglass mold from it. Then you are ready to produce endless fiberglass copies.
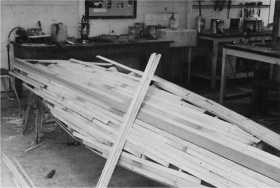
A plug (also called a pattern or former) is a perfectly shaped, perfectly smooth, perfectly rigid, glossy replica of the kayaks you want to make in a mold. One way to make a plug is to make a perfect wooden kayak, for example using strip-plank construction. The vintage photo above shows an early stage in building a strip-plank plug for Alan Byde's old Sea Tiger design.
A plug does not need to be a kayak, it just needs to be kayak-shaped. It does not even need to be hollow. Manufacturers usually make their plugs from disposable materials such as wood and plaster, or carve them from a solid block of polystyrene or polyurethane foam just like making a surfboard. Here's a photo-essay from Shaggy Designs.
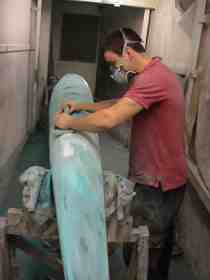
You can put a tough, smooth surface on the plug by coating it with polyester auto filler compound, and then doing a lot of careful sanding and polishing as in the photo. You can put a shiny, hard finish on it by coating it with specialist materials such as Furane.
Make a mold
The purpose of the plug is to create a mold. A mold is the same shape as a kayak, made of a fiberglass laminate two or three times as thick as that used for a kayak, but shiny on the inside, not the outside.
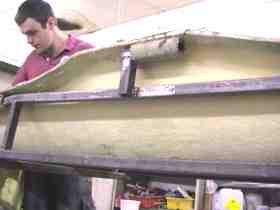
The outside is very rough and has added stiffening ribs which make it even rougher. The photo shows a factory mold stiffened with an exoskeleton of steel pipe. The mold is in two halves, one for the hull, one for the deck, plus a mold for the cockpit coaming.
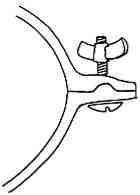 The hull and deck molds must have a horizontal flange along the edge so they can be bolted together. One flange should have a ridge which keys into a dip on the deck flange, as in this illustration courtesy of Alan Byde.
To make a flange, take some plywood or hardboard. Make two long curved strips, one a mirror image of the other. Each should be 2 inches wide, a little longer than the plug and cut in a curve which perfectly matches the shape of the plug where the hull-deck seam is to be. Glue a long strip of wood, with a semi-circular cross-section, onto one side of each strip to form the ridge. Use filler, sealer and polish to make that side of each strip as smooth and glossy as the plug.
Now attach a strip to each side of the plug along the line of the intended hull-deck seam. The strips must be at a right-angle to the vertical sides of the kayak, with the shiny side facing downwards.One way to do this is to make many little L-shaped brackets from aluminum sheet, screw them to the unpolished side of the plywood strips, use adhesive tape to attach the strips temporarily to the plug along the line of the intended hull-deck seam, and then screw the brackets to the deck of the plug and take off the tape.
You are ready to make the hull mold. Turn the plug over so that the hull is uppermost, take some release agent and carefully wipe it over the hull and the plywood strips. Apply gelcoat, glass reinforcement and polyester resin and allow to harden. Your mold needs to be really stiff and rigid, so add more layers of glass and resin, add some stiffening ribs, and leave in a warm place to cure for a few weeks. Then separate your new laminate from the plug - you now have your hull mold, complete with flange.
To make the deck mold, turn the plug the other way up, unscrew the flange strips and fill, smooth and polish the screw holes in the deck. Replace the hull mold. Cover the plug's deck and the flange of the hull mold with release agent, apply gelcoat, reinforcement and resin as before.
You will also need another, smaller mold for the cockpit coaming. This will usually incorporate a suspended seat. To design a comfortable seat and make this molding from zero would be a huge amount of work, and even professional designers sometimes quietly copy the seat from another kayak which they find comfortable.
Go to next page for:
• Build your own wood kayak