This fiberglass sea kayak was snapped almost in two but repaired almost as good as new. Picture courtesy of Murty Campbell of Stornoway Canoe Club.
Salt, water, abrasion, sunlight, waves and rocks are tough on kayaking equipment. It's made to last but it needs some basic care.
Repairs & repair kits
A small repair kit is convenient and avoids the problems identified at Travelling Light. If you are being assessed as a kayak coach, or going on an advanced trip, you will need a big repair kit.
Small repair kit
Just a roll of repair tape carried in a drybag. A good-quality cloth-reinforced tape, 2" wide and with waterproof adhesive may be called duct tape or cloth tape. Gorilla Tape is a good brand, highly recommended. Gaffers tape, gaffa tape or gaff tape looks similar and it's often waterproof, but it's much weaker because you're supposed to be able to tear bits off with your fingers. You'll probably need to use your teeth for Gorilla Tape.
Duct tape is enough to make most repairs to a broken kayak, a broken paddle or a broken arm. And before anybody tells us that is irresponsible advice, in 1995 the BCU's Canoeing Handbook defined a minimum repair kit as "a roll of good quality 5 cm wide... tape and a knife".
Big repair kit
The following is suitable for a multi-day camping trip by a medium-sized group in fiberglass kayaks, some of them fitted with a skeg, rudder or pump.
• Big roll of waterproof duct tape 2 inches wide.
• Instant patch kit. See Instant Patch For Any Kayak.
• Kit for field repair to FRP kayak. See Emergency Repair To An FRP Kayak (Fiberglass, Carbon, Kevlar).
• Multi-function tool such as a Leatherman. Or a pair of short taper-nosed stainless steel pliers with wire-cutter; screwdriver with a selection of plain, cross-head and Allen key bits; and a sharp awl.
• Strong craft knife such as a Stanley knife, with three strong replaceable blades.
• Mini hacksaw and three blades.
• Half a sheet of 120 grit abrasive paper. If you use silicon carbide "wet & dry" abrasive paper, it won't disintegrate in damp conditions.
• Cigarette lighter.
• A piece of cotton rag to wipe surfaces dry before repair.
• 30 mL two-tube pack of epoxy adhesive such as Araldite. Not a 10-minute rapid epoxy because it is seldom waterproof. Not a pack which has already been used. Once the metal seal on the nozzle has been broken, the contents deteriorate quite fast.
• Small tube of sealant, preferably Sikaflex polyurethane marine sealant.
• If you have a built-in pump, suitable spare parts. Also some stainless steel hose clips in case the outlet hose has to be re-attached to the hull fitting.
• Galvanized steel L-brackets with pre-drilled holes. Two 50 mm, two 25 mm.
• Ten self-tapping screws compatible with the brackets.
• 10 feet of braided 1/8" polyester or nylon cord (e.g. paracord or rock climber's accessory cord).
• 5 feet of 3/16" shock cord
• Two ordinary needles and two sailmaker's needles. These are large, strong and have a triangular cross-section which easily penetrates thick materials such as elastic shock-cord. If you have room, take a sailmaker's leather "palm" in case you need to sew the elastic back onto a sprayskirt.
• A reel of very strong synthetic thread, not too big to fit into eye of a sailmaker's needle. For example, Marlow polyester whipping twine, number 8, waxed. From a marine supply store. See Retail Outlets.
• Two ordinary needles.
• A reel of ordinary strong polyester thread for repairs to clothing.
• Tube of neoprene cement for wetsuits and sprayskirts. See Wetsuit Material.
• Tube of Aquaseal for waterproof clothing. Can also be used to repair inflatable buoyancy bags.
• Roll of tent repair tape.
• Tent pole repair sleeve.
Everything on the table in the photo below fits into the large blue screw-top cylinder. It includes everything listed above apart from the field repair kit for fiberglass kayaks. It also includes a big first aid kit (bottom left) and an orange plastic survival bag. The small objects all fit into the two smaller cylinders which nest inside the big one.

You can get some great waterproof boxes in any supermarket, for example the Curver product range.
On a group trip to a wilderness area, you may also want to take:
• Hand drill and bits
• Pop-riveter and thirty assorted rivets. See Metals & Salt Water.
Instant patch for any kayak
If a kayaker hits a rock and punctures the hull of his/ her kayak, or loses a hatch cover, it is very useful to be able to put a watertight patch over the hole while the kayak is wet. If necessary you can do this at sea, by putting the damaged kayak upside-down on top of another kayak as in this illustration. In a cool climate, get the kayaker onto the raft too.
You can put an instant patch on a wet kayak using the following materials, all of which are available from a building supplies or home improvement store:
1. A 15-foot roll of waterproof duct tape. It won't stick to a wet kayak, but it will stick to itself if you wrap it all the way round the kayak.
2. Galvanized wire, 5 feet. Ideally, wire which is thin enough to be bent, tied and shortened with your fingers.
3. Repair bandage that will stick to a wet surface:
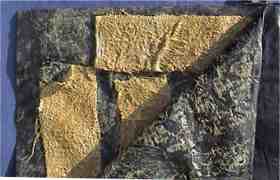 a) One messy but effective solution is Denso tape. Denso makes a big range of tapes for sealing joints in glass roofs and preventing corrosion in outdoor pipework. The one we're thinking of is sold as Sylglas in the UK. It's a 2-inch wide cotton bandage saturated with non-setting mastic. One version has a layer of aluminum foil on one side to make it easier to use.
It sticks to all kayaks, whatever they're made of. It sticks almost as well to wet surfaces as to dry ones and will stay in place for several days if necessary. The mastic is extremely sticky. You can get it off your fingers using a rag soaked in white spirit, but try not to get it on your clothes.
In the photo above, the basic bandage has been cut into twelve 20-inch lengths and pressed between two sheets of thick polythene. This prevents the mastic spreading over your other equipment and makes the bandage easier to use outdoors.
It's not ideal for patching polyethylene kayaks because the mastic gets into every little scratch and as soon as you try to weld the split, the mastic melts and flows straight into the split.
 b) You may prefer bituminous bandage made for flashing, roof repairs and waterproofing underground structures. Products include Bituthene and Miradri in North America, and Black Jack and Aquaband in the UK. They are less floppy and gooey than Sylglas and very good in hot weather, but on a cold day they hardly seem sticky. The instructions usually say "not for use in temperatures below 40°F (5°C)".
4. Plastic reinforcement sheet.
To repair a large hole in the hull of a kayak you may need some semi-rigid plastic sheet to cover the hole and support the repair tape. One way to get it is to cut up an old 1-gallon container of antifreeze / coolant, washer fluid or milk.
During assessment for sea kayaking qualifications, some assessors love to take a large oval hatch off a kayak at sea, and tell the candidate to make an effective replacement there and then. That could mean making a semi-rigid covering 18 inches long and 11 inches wide. It also means having a patch kit someplace you can reach it without taking off your sprayskirt or a hatch cover. You could keep it in a deck bag or a fanny pack (nylon bag on an adjustable waist belt).
Repairs to polyethylene kayaks
You can't really make a permanent repair to a polyethylene kayak on the beach because it needs welding. But there is one thing you can do. If a split appears in the hull of a polyethylene kayak, it will carry on getting longer ("propagating") every time the hull flexes. You can stop it by making a small round hole through the end of the split with a 3/32" drill or a piece of hot wire.
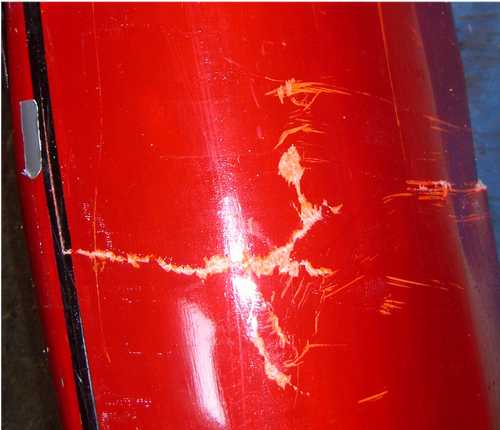
Emergency repair to an FRP kayak (fiberglass, carbon, kevlar)
You can make permanent repairs to an FRP kayak on the beach.
To repair moderately serious damage you will need 250 mL resin with catalyst; 3 feet x 1 foot of fiberglass reinforcement such as 450 gm CSM; polythene sheet and adhesive tape; half a sheet of 120 grit silicon carbide "wet & dry" abrasive paper; small sharp scissors; mixing pot; two disposable brushes; protective gloves; barrier cream and hand cleanser. If you plan to break your kayak in half and stick it back together, multiply these quantities by ten.
You will have to get the damaged area dry, and keep its temperature at 55 degrees fahrenheit (12°C) or more until the resin gets hard. With a quick-setting resin at 70°F (20°C) this might be ten minutes; with a slow-setting resin at marginal temperatures it may take 24 hours.
If you are taking an FRP kayak on an advanced expedition, you will probably take a repair kit containing resin, catalyst, and enough fiberglass reinforcement to laminate two layers over a large hole or split. For some technical information, see Fiber-Reinforced Plastic (FRP) and the related page How To Add Accessories To A Kayak.
Probably your kayak consists of glassfiber reinforcement in a matrix of polyester resin. Epoxy resin will stick to it better than polyester resin, but epoxy is more hazardous and expensive. We have never had a problem using ordinary polyester resin to repair an FRP kayak as long as the surface was clean and dry. In the unlikely event that your kayak was made of epoxy resin, you will need epoxy to repair it.
 You can easily buy polyester resin and CSM (chopped strand mat) at an auto accessory store or from an internet supplier as at Retail Outlets, or you can go to a marine supply store and pay three times the price. The auto accessory stuff has always worked well for us. On the Internet or from a chandler you may get a marine-grade resin and better reinforcements such as woven rovings. For a hull repair, 300 gm/m2 woven rovings would be better than 450 gm/m2 CSM. A chandler may also have close-weave fiberglass tape in 1-inch or 2-inch widths. Glass tape is nice for making a neat repair to a split seam or gouged chine.
You will want a bit of abrasive paper to get the surface of the kayak clean and slightly rough, sharp scissors, a mixing container, and ideally several disposable brushes so that you can get the reinforcement properly wetted-out with resin.
To keep yourself clean and avoid dermatitis you want protective gloves. Those thin clinical latex gloves dissolve too quickly in contact with polyester resin and rough surfaces. Nitrile gloves are best but ordinary Rite Aid or Vileda household latex gloves usually last enough to do a repair. Ideally you should also have barrier cream and hand cleanser intended specifically for use with polyester resin.
For larger holes you will need some polypropylene or polythene sheet and sticky tape to make a temporary patch over the hole. The temporary plastic patch supports the FRP patch in the correct shape until it is hard.
For a nice, neat permanent repair it is best to tape your temporary plastic patch to the outside of the hole, and work from the inside of the kayak to laminate your FRP patch. In other words, reach in through the cockpit or a hatch to apply the resin and cloth. Of course, you won't be able to do this if the hole is in an inaccessible place such as underneath a permanently-fixed seat. If you are stuck on an uninhabited island, it is better to make an untidy FRP repair on the outside of the hull than rely on a Denso tape patch to get you home. And when you do get home, you can easily get the untidy patch off with an electric sander and do an artistic job including a glossy layer of waterproof gelcoat on the outside, perfectly color-matched to the kayak.
The ideal temperature for working with polyester resin is 70°F (about 20°C) which is a comfortable room temperature. Too hot and the resin sets before you're ready and may crack, too cold and it may never become fully hard. In cool weather you can pre-warm the resin before you mix it, for example by putting the container inside your clothing. A patch should eventually set hard despite an air temperature as low as 42°F (6°C) as long as you can keep the boat in direct sun and out of the wind. However at marginal temperatures it is worth trying to heat up the patch until it sets, and then for 24 hours afterwards if you can manage it.
 Having applied local heat to broken kayaks with everything from a Trangia camp stove to hot rocks, we can offer the following tips. Covering the patch with bit of black plastic will double the power of sunshine. You may be able to keep the patch warm until it is more-or-less hard by heating a pan of water on a camp stove and putting the pan into light contact with the patch, or pouring warm (not hot) water into a plastic bag or hydration system bladder and resting that on the patch. In an emergency in winter it is possible to get a kayak warm and dry by making a fire of driftwood. Try to avoid anything that will cause soot to build up on the surface you're repairing, for example a candle or a Trangia flame. If you get really, really desperate, a traditional remedy is to paint denatured alcohol / methylated spirits or acetone onto the kayak and set fire to it ... not recommended.
The patch should feel hard within 10 to 40 minutes depending on the temperature, but it carries on curing for a month. You can use your kayak as soon as the patch is hard, but it would be better to keep it warm and dry for a day.
If you carry liquid resin in one end of your kayak, make sure your food and drink are at the other end. Otherwise everything from porridge to curry will taste of resin. Try to carry catalyst in the form of a paste in a small plastic tube with a screw top, not a liquid in a small bottle. Bottles of liquid catalyst always leak, and the catalyst is corrosive and irritant. Unfortunately the paste catalyst tends to have a blue, red or yellow pigment.
Storing your kayak
You don't generally need to rinse a kayak after use but if yours has aluminum components or a rubber diaphragm in a built-in pump, you might consider it. Adjustable footrests which run in an aluminum track eventually seize up solid if they are left salty. Footrest tracks made entirely of non-corroding materials such as nylon sometimes become jammed with salt deposits. Salt is highly soluble, so you should be able to clear it away quite easily with fresh water.
A kayak should ideally be stored with the hatch covers removed, in a cool, dark, dry place, on a padded rack which supports it in at least two places.
If you have an old, slightly battered fiberglass kayak and you do a lot of kayaking, it can live all year round on the roof of your car. It's good if it has a cover to protect it from weather and sun but unlike a polyethylene kayak, fiberglass can take a lot of UV light without deteriorating.
Wooden kayaks shouldn't be stored in direct sunlight, anyplace water can collect inside, or anyplace really hot and dry. Take off the hatch covers so there isn't a moist micro-climate inside the watertight compartments. A wooden or plastic composite paddle may warp if stored horizontally for long periods and only supported by the ends. See Protecting Your Wood Kayak.
Maintenance for kayak hulls
The hull of a fiberglass or polyethylene kayak is not affected by water or salt and needs no routine maintenance.
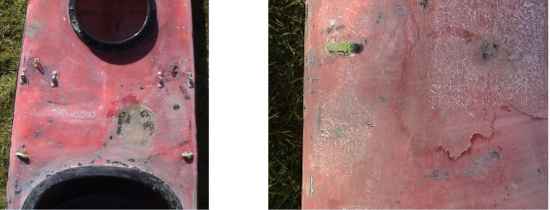
It is possible to restore the good looks of a very old, battered fiberglass kayak and give it another ten years of life by patching all holes with fiberglass, or polyester autobody filler if the damage is only a small gouge, sanding it smooth with wet-and-dry abrasive paper, and then sanding it even smoother and painting it. For the best and lightest results, you could use a two-part polyurethane yacht paint. This very sad translucent pink kayak is now a glossy dark green with co-ordinating deck rigging.
Wooden kayaks and paddles should be coated both sides with something suitable. You could use Danish oil, paint or varnish. These coatings need to be refreshed every two or three years. Some like to give new wooden boats or paddles a complete coating of epoxy resin. See Protecting Your Wood Kayak.
A skin-on-frame kayak will need a new skin from time to time. If it is used often but carefully stored, the skin may last five years. A skin may last twenty years if it is made and waterproofed with space-age materials and stored well.
Metals & salt water
Salt quickly corrodes all metals used in boat construction, except for marine-quality stainless steel, bronze and monel metal. It gets into cameras and "waterproof" radios and turns them into a lump of corrosion.
Stainless? Marine-grade stainless steel generally means type 316 austenitic (non-magnetic) steel. Try holding a compass over the object. If the compass needle does not deflect, the object should be highly resistant to corrosion but even type 316 stainless steel will corrode eventually. It's good practice to rinse ALL your equipment in fresh water and let it dry after use on the sea, but in practice corrosion of marine stainless steel is not a problem unless you leave a small object such as a knife in a wet salty pocket for months at a time. Before long-term storage, wipe on a thin layer of oil.
Aluminum is light, strong and used in boats probably more than any other metal. It is much softer than stainless steel so if you over-tighten a steel screw in an aluminum component it is quite likely that the screw thread will strip out.
In the small dimensions and quantities required to make ladders, small boat spars and kayaking equipment, aluminum is almost interchangeable with wood, and with plastic composites (fiberglass and carbon fiber). The deciding factor is not usually weight or strength but aesthetics and manufacturing economy. Nearly all yacht and racing dinghy masts are now made of aluminum with only a few made of wood or composite, but windsurfer masts are made of plastic composite. Good kayak paddles can be made of any of the three.
Billets of aluminum can be extruded through a metal die to produce bar, rod or tube in any length. [2017: Thank you to Edwin S for a correction and for the following comment: The metal flows and deforms but does not begin melting. This extrusion process also impacts the heat treatment and hot/cold working that impart strength.]
Aluminum products can be heat-treated (tempered) for increased hardness and strength. They are produced in a wide range of alloys each with a different emphasis on strength, hardness and resistance to corrosion. For marine use, aluminum is alloyed mainly with manganese, magnesium and silicon. Alloys commonly used for boat spars include 6061 (HE20 in the UK), 6063 (HE9) and 6082 (HE30). They are easy to extrude and have good resistance to corrosion by sea water.
Aluminum is particularly subject to metal fatigue after only a small amount of flexing. For a kayaker, this means that a paddle shaft made from thin-wall aluminum tube may snap in half without warning when you try to roll in a difficult place. However a paddle shaft with thick walls can take 25 years of hard use, and aluminum can resist impact and crushing forces which would shatter a fiberglass shaft.
Aluminum is an excellent conductor of heat so it feels cold to the touch. When it is used for paddle shafts, the manufacturer often puts on a sleeve of PVC (vinyl) to make them less slippery and warmer.
Aluminum can corrode very fast, especially alloys selected for high tensile strength rather than resistance to sea water. A rock-climbing carabiner will seize up solid after only a few uses on the sea, unless it is washed in fresh water every time.
Aluminum surfaces exposed to air naturally form a very thin skin of aluminum oxide which is resistant to corrosion (passivation). A PVC sleeve on a paddle shaft may lead to rapid corrosion by trapping a layer of salty water next to the aluminum, which starts turning to mush until the sleeve blisters. A quick alternative is to wrap duct tape round the paddle shaft where your hands will grip it.
Tubular components for marine use are usually anodized (electrolytic passivation) to increase the thickness of the oxide surface. Anodizing can be grey, black or gold and can be colored glossy red, blue, etc with a dye sealant.
Brass. Does brass have any place in a sea kayak? It's heavy, it's weak and it corrodes in sea water. Even when new, brass screws often snap when you put them in. Brass is an alloy of copper and zinc, and if a brass object is exposed to salt water for a long period, the zinc will disappear so that the metal looks solid but is in fact a weak honeycomb.
Galvanic action. If two different metals are used next to each other, for example an aluminum rivet used in a stainless-steel component, then in the presence of salt water or salt spray there will be a weak electric current running between them. This galvanic action causes rapid corrosion of the least "noble" of the two metals. A fresh-water racing kayak has an aluminum rudder blade on a stainless steel pivot. Use it on salt water and galvanic action will soon enlarge the hole in the rudder blade so that it has to be replaced with a plastic or stainless one. Salt-proof models are available. See Rudder. Galvanic corrosion is even worse if there is an electrical current from built-in lighting or electronic systems.
If a metal fitting is fixed to a wooden object which is damp and salty, both the metal and wood may be damaged by galvanic action. For example, screws made of marine stainless steel and used in oak, or screws made of brass and used in mahogany.
Monel metal is a nickel-copper alloy and highly resistant to galvanic action although if used next to steel in a marine environment, the steel will be damaged. Screws and rivets made of monel metal are sold for yacht repairs, but they are very expensive.
Practical solutions. Kayak fittings are usually attached with stainless steel bolts, nuts and screws, or aluminum rivets.
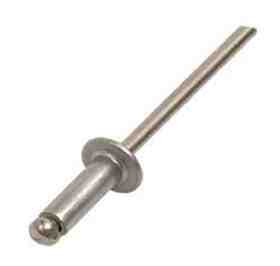 This is a close-up of a pop rivet. To use, you drill a hole through two objects to be joined together, slip the head of a rivet through the hole, and use a riveting tool to pull the long stem. This squeezes the head until it bulges out. The two objects are caught between the flange and the bulge, and the stem then snaps off and is thrown away.
The head has to be soft so it is usually made of aluminum. If aluminum is in contact with a dissimilar metal, or is even near a dissimilar metal, in the presence of salt water it will quickly corrode because of galvanic action. The stem of a pop rivet is usually made of a different alloy to the head. The best answer is to buy extremely expensive rivets, made for yachtsmen out of monel metal. The usual answer is to give the kayak the occasional wash with fresh water, and replace corroded rivets every five or six years.
Storing kayak clothing, etc
After every trip, use fresh water to rinse your clothing, tow-belt and helmet, and your hatch covers if they are made of rubber. Take special care to get salt off metal rivets, zippers and clips, especially if they are made of aluminum, because otherwise they may corrode.
Just put everything in the bath and give it a good spray, squeeze and rinse. Don't use detergent or a pressure washer. Don't use a hose except briefly to rinse off loose sand. An outdoor pursuits center will have a plastic barrel full of fresh water for this purpose, drained once a week so that accumulated salt and sand can be dumped.
If you use wetsuit boots, you will occasionally need to clean the insides with soap. Just put in a bar of ordinary hand soap, squish it around a bit, rinse and dry carefully.
Wet equipment gets very smelly if left in an unventilated space at high temperatures, whether in your vehicle or in the drying-room at an outdoor pursuits center. Before your equipment dries, bacteria will rejoice, flourish, spread and die.
When your equipment is dry, store it in a cool, dark, dry place. Things made of plastic foam, such as wetsuits and PFDs, should ideally be hung up so that the foam is not creased or compressed. For wetsuits, use a fat plastic clothes hanger, not a thin one made of wire. For drysuits with latex rubber seals, consider dusting the seals with talcum powder or applying Seal Saver or 303 Protectant before storage.
Go to next page for:
• Transporting Your Kayak
• Knots For Kayakers