Accessories which are essential for safety
Bulkheads
Every sea kayak needs positive flotation. This could take the form of a cockpit pod, inflatable air bags, or bulkheads for a rigid kayak. It is good to have some closed-cell foam flotation too. See Additional Flotation For Your Kayak.
 A bulkhead is a wall across the inside of a boat which seals off one end to create an airtight buoyancy tank. Most rigid kayaks have one just behind the seat and another at the kayaker's feet. With a bulkhead in each end, a sea kayak is almost unsinkable.
Usually there is a hatch giving access to the interior of each tank so that spare clothes and other things can be stored inside it.
If a kayak has no bulkheads you can easily make some from a sheet of closed-cell polyethylene foam. You can get small amounts of PE foam in sheets 1/2 inch to 1 inch thick from a good kayaking store. See Retail Outlets. Make a disposable cardboard template so you know what shape to make the bulkhead, and use a bread-knife to cut that shape out of the PE sheet. Give the relevant part of the hull a really good scrub with a stiff brush and lots of fresh water to get the salt off, and let it dry. Lightly rub the hull surface with some mild abrasive paper, say 400 grit, where the bulkhead is to go and then fix the bulkhead in place with a flexible waterproof adhesive. Ideally, use a polyurethane marine sealant such as Sikaflex.
If you don't have any PE foam you can still easily fit bulkheads to a wood or fiberglass kayak. Cut some 1/8 inch marine plywood to the required shape, or make the shape out of fiberglass. Two layers of "chopped strand mat" glassfiber will be enough. CSM is a coarse white felt. Cut the CSM pieces slightly larger than the shape of your bulkhead. Lay the first piece down on a flat surface covered with a layer of "polyester release film" (Type A Mylar, or Melinex). Polyethylene (polyethene) sheet is cheaper but not as good. Mix no more than 1/2 pint of polyester resin at a time and use a brush to wet out each bulkhead. Put on less resin than you think you will need and use the brush in a vigorous stippling action. Work fast, especially in warm conditions, and don't work in direct sun. If 1/2 pint is enough to turn all the CSM from white to dark, don't add any more. The resin will soon set. When it is as hard as toffee, trim the bulkhead to shape with a sharp knife. Then fix it into the kayak using fiberglass tape and more resin. Observe the usual safety precautions, in particular wearing rubber gloves to prevent dermatitis and taking care not to cause fire. See How To Add Accessories To A Kayak.
If you install a rigid bulkhead in direct contact with the hull, it will reduce the hull's ability to flex. If you have a really lightweight fiberglass kayak, this may eventually cause stress fractures where the bulkhead touches the hull. You can avoid this by gluing an inch-wide strip of 3/8" closed-cell PE foam, from a high-quality sleeping pad, round the inside of the hull. Cut 1/8" off the bulkhead all the way round before you fit it. The foam strip then acts as a cushion between hull and bulkhead.
When one end of a kayak is sealed off with a bulkhead, it becomes a watertight compartment but it probably has some microscopic leaks. If you have a watertight compartment without a hatch, drill through the deck just inside the watertight compartment and fit a screw-in drain plug. The air pressure inside your kayak changes with temperature. When you put it on the water, it will cool down. The air in the watertight compartments will shrink and your hatch covers will bulge inwards until the pressure equalises through microscopic holes. Some kayakers drill a very small hole in the center of each bulkhead to allow air pressures to equalize, as otherwise the reduction in air pressure may suck a small amount of water in through the seams.
Hatches
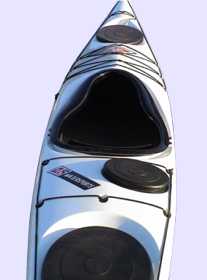 To get things in and out of the watertight compartments created by your two bulkheads, you need holes in the deck surrounded by raised rims (coamings). In other words, hatches. Most sea kayaks have two. Quite often there is a third bulkhead and hatch to create a very small watertight compartment (a "day hatch") just behind the cockpit. This is makes an alternative to a deck bag for carrying things you may need at sea such as flares, a patch kit for a leaking kayak, a hat, camera, drink or snack
A kayak sits low in the water and waves often wash over the deck. For safety it must be possible to seal your hatches before you go afloat so that water cannot get in.
It is possible to make hatches and covers which are safe and satisfactory for use on the sea, but it's not easy and you can easily buy very good hatches specially made for sea kayaks. They usually consist of a rigid plastic rim with a flange and a separate cover. They are light and strong, their covers don't screw on (screw threads are a real problem if a few grains of sand get caught in them), they are easy to get on and off, and with the cover in place they are 99.9% waterproof.
Circular hatches with an opening 12 in across are very common. If you often carry a sleeping bag and cooking equipment you will probably want a large oval rear hatch, say 25 in by 14 in. See Overnight Trips.
Kayak manufacturers use methacrylate adhesive, rivets or bolts to attach a hatch rim around the edge of the hole in the deck. If you want to retro-fit a hatch to your kayak, this is a major operation on a curved deck but easy on a flat deck. Just cut a hole in the deck, if necessary reinforce the edge of the hole with a backing pad, attach the hatch rim temporarily, drill holes through rim and deck all the way round at one-inch intervals, smear sealant onto the deck and the underside of the rim, and bolt or rivet it into place. See How To Add Accessories To A Kayak.
Hatch covers
Hatches must be sealed before you can go afloat. Hatch covers are usually made of flexible rubber, or a semi-rigid plastic such as polypropylene.
The lightest option is to make them from sprayskirt fabric. See Wetsuit Material and Thermal Stretch Materials. Flexible hatch covers have an elastic band round the edge to grip the hatch rim, either a ring of heavy-duty bungee in a hem or sewed directly onto the edge of the cover, or a solid rubber rand glued to the edge. A flexible hatch cover may implode when a heavy wave lands on the deck, so it's probably a good idea if it has a rigid insert slightly larger than the hatch opening.
If your hatch covers are not only watertight but airtight, they will keep most of the water out of your kayak if you hit something hard enough to make a hole in the bottom.
 Many hatch covers are made from natural rubber. Easy to use and instantly making a highly effective airtight seal, they are very satisfying but not perfect. They are heavy and if they spend too long sitting in hot cars, direct sun, salty water and damp winter grass they perish, and after some years (ten?) they turn into black shrapnel. You can extend their life by taking them off the kayak after every use, washing in fresh water and storing in a cool dark place.
If you do a lot of kayaking in strong sunlight, you may be better off with hatch covers molded from polypropylene or solid neoprene.
Since hatch covers tend to be black, they are easy to lose on a boulder beach at lunch time, or if you have no choice but to take one off at sea. It's worth attaching them to your kayak with a short length of thin cord.
Most fiberglass kayaks leak slightly at the hull-deck seam or elsewhere, and even polyethylene kayaks usually seem to leak slightly. Any equipment that needs to stay completely dry should be in a dry-bag or a waterproof box. See Stowing Equipment In A Sea Kayak.
Deck rigging
A long kayak which goes any distance away from the shore should really have a continuous line round the perimeter of the deck, or some equivalent, to provide grab handles for deep-water rescue. It is useful also to have a secure way to attach your spare paddle along the deck when not in use, and attachment points for towing.
Most modern sea kayaks have a perimeter line right round the deck, attached to the deck every 30 inches and pulled taut.

Deck rigging which goes across the deck are usually made of elastic bungee to get a temporary grip on a paddle, chart or deck bag. See Deck Elastics and Paddle Park / Tow Point.
The perimeter line should ideally be made of top-quality non-stretch cord, which usually means a polyester core. For comfort it should preferably be 5 mm (3/16") in diameter with a smooth surface to protect the deck. You could use rock climbers' accessory cord or polyester cord from a marine supply store. See Retail Outlets. Black and other dark colors look good. Red, yellow and green can look good but tend to fade to pink and gray in sunlight.
Traditional kayaks don't have a continuous perimeter line. See Skin-On-Frame Kayaks & Offshore Safety.
Perimeter lines make deep-water rescues much easier. When one kayaker goes for an accidental swim, his friends will grab his kayak and empty it out. They may have to get it right out of the water on top of their kayaks, upside down. A flooded sea kayak is heavy and slippery. If the distance from the casualty's cockpit to the casualty's end loop is further than the rescuer's arms can reach (s)he needs to find some deck rigging to grab hold of. No rigging, no rescue. And the casualty needs to hold onto the rescuer's kayak and may need to go from one side of it to the other. He can easily do this by pulling himself round, hand over hand using the rescuer's perimeter lines.
If you intend to paddle solo you may want something just behind your cockpit so you can quickly attach your spare paddle across the rear deck as a rescue outrigger. See Self-Rescue For Solo Sea Kayakers.
Manufacturers attach deck rigging by threading it through rigid loops or bars which are recessed into thumb-print sized hollows molded into the deck of the kayak. These are known as inserts, recessed deck fittings or RDFs. Older kayaks with one-piece RDFs made from ABS thermoplastic often have two or three broken ones.
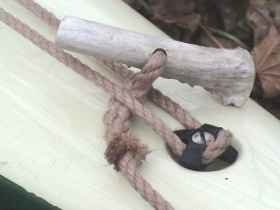
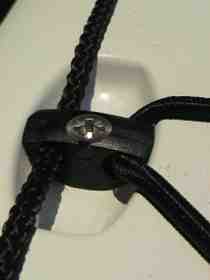 Today's designs are much stronger. Deck rigging is usually run under either a stainless steel rod or a block of molded nylon which is attached with screws to a backing pad under the deck. This particular one is used by Valley. It is neat, effective, and will not cause damage if one kayak is dragged over another during a TX-Rescue.
RDFs provide a secure anchor for deck rigging without preventing you from tightening the lines if they stretch or replacing them if they get damaged.
 If your kayak does not have deck fittings, you can add them yourself. The easiest way, and the only way if you have a polyethylene kayak, is to buy a dozen little nylon or stainless steel loops (closed fairleads or lacing eyes) from a marine supply store and fix them to the deck. See How To Add Accessories To A Kayak.
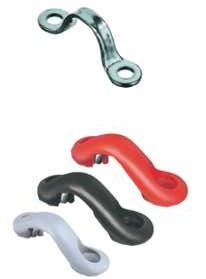
There is the basic kind in marine-grade stainless steel, fancier ones in carbon fiber or color-anodized aluminum, or some aimed specifically at sea kayakers called Topcleats.
To rig your perimeter lines, just slide 12 yards of 3/16" or 1/4" cord through the fairleads and end loops, get it as taut as you can, and tie it off. See Knots For Kayakers.
Recessed deck fittings are definitely better because they don't damage your knuckles or equipment, or other boats during a deep-water rescue. You can fit them yourself to any fiberglass or wood kayak. You could buy a dozen molded plastic RDFs from a specialist supplier of sea kayaks, but to fit each one you have to cut a fair-sized angular hole in your deck.
It is cheaper and stronger to mold your own recessed deck fittings onto the underside of the deck. It is also slightly easier, because the method requires you to drill small circular holes in the deck rather than cut precise angular holes. You are creating a dozen fiberglass tunnels at various points under the deck. At each of these, your perimeter line will dive into a hole drilled through the deck, travel 2.5 inches or so through a tunnel and pop up at another drilled hole. There's an illustrated guide online here at Gerald Maroske's Kayak Origami, and John & BJ have put their experiences online here.
Briefly, you can use a short length of cheap disposable PVC (vinyl) tubing to ensure that the inside of each tunnel is smooth and straight. The external diameter of the tubing needs to be 1/16" larger than the diameter of your deckline. First, reinforce the deck at each point where you want a fitting by making a fiberglass backing plate on the inside of the kayak. See How To Add Accessories To A Kayak. Then at each point, drill two holes through both the deck and the backing plate, 2.5 inches apart, on the line you want your perimeter line to follow. Slide a length of PVC tubing through both holes so that it creates a tunnel under the deck with 4 inches above the deck at one end and at least an inch at the other. Use adhesive tape to flatten the ends of the PVC tubing onto the deck so that it lies in the same line a taut perimeter line will follow. Cover it, under the deck, with a fiberglass pad made in exactly the same way as the backing plate. The pad should be large enough create a one-inch flange all round the tunnel, in contact with the deck. Use CSM (chopped strand mat) reinforcement, not a woven reinforcement, because CSM will conform nicely to the lumpy shape of the tunnel. Wet it out with polyester resin to dissolve the binder, and it will wrap tightly over the PVC tube. When the pad has fully set, use the 4-inch end as a handle to pull out the PVC tube. Throw the tube away. Rig your perimeter line as before. Observe the usual safety precautions, in particular wearing rubber gloves to prevent dermatitis and taking care not to cause fire.
 .
.
Bow & stern handles
It's very useful to have a handle at each end so the kayak can be carried, towed, emptied out and securely attached to the roof of a vehicle. Plastic whitewater kayaks usually have some sort of strong, comfortable molded handle.
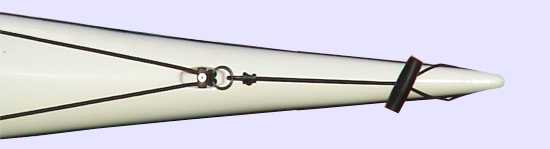
Sea kayaks very often have a plastic toggle fixed to the perimeter line, one at the bow and one at the stern, in such a way that they can't rattle against the hull. One of the last steps when building a fiberglass kayak is to fill the ends by pouring in glass and resin to make a solid plug. Then a hole can safely be drilled through the tip of the kayak from one side to the other, and an end loop can be threaded through the hole.
Rather than a plastic toggle, some sea kayaks have soft end loops, each made of an eight-inch length of nylon webbing 3/4" wide. These are big enough to get four fingers into and they work very well, but should not be made from cord or thin rope. When you carry your kayak, a thin rope will cut into your hands and if you come out of your kayak in surf and are holding it by an end loop when a wave makes it spin, the end loop could tighten on your hand. River legend has it that some whitewater kayakers have lost a finger that way.
You can dispense with toggles and end loops altogether if you have a continuous perimeter line which goes right from one end of the kayak to the other. Just pad the end eight inches of the perimeter lines by wrapping some cord round them, and use that as a handle.
Additional flotation for your kayak
Any sea kayak should be fitted with flotation, either with two bulkheads so that each end is a large watertight compartment, or a cockpit pod or at least inflated air bags.
It is good to have as much foam or inflatable flotation as possible. If you get a leak in one end of your boat, or you lose a hatch-cover at sea, this sort of positive buoyancy can prevent your kayak sinking at one end and ending up vertical, useless and hard to rescue.
Several US and UK Coast Guard investigations into fatal kayaking incidents have concluded that everybody would have survived all the other factors (inexperience, inadequate clothing, bad weather, recklessness, getting separated, lack of safety equipment) if only the victim's kayak had had foam or inflatable flotation IN ADDITION TO bulkheads or a cockpit pod.
The extreme ends of a sea kayak are not much use for storage, and have a way of trapping objects such as coins, keys, oranges and water bottles, so they may as well be full of foam buoyancy.
A cubic foot of sea water weighs about 64 lbs. It is usually more convenient to say that a liter of water weighs about one kilogram. A typical buoyancy tank with a volume of 100 liters will support a 180 lb kayaker high and dry, but it will weigh 100 kg (220 lbs) if it fills with water. To make matters worse, when a traditional sea kayak is upside down, its raised and overhanging ends become the lowest point. Any water which has got into the ends will collect in the tip. If the kayak has to be emptied at sea in a deep-water rescue, this will be difficult and dangerous for the rescuer if there is even 20 lbs of water in one of the tips. The rescuer may be able to get one end of the casualty's boat onto the front deck of his or her kayak, but then be unable to lift the other end out of the water. Yes, the casualty can swim round to the other end of his kayak and pull, but the crushing weight on the front deck of the rescuer's kayak may cause damage to one or both boats.
So, it makes sense to add some extra flotation using pillars of closed-cell foam and/or inflatable buoyancy bags.
Foam flotation:
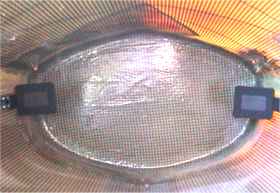
The easiest method is for the kayak manufacturer to install a vertical pillar of expanded polystyrene foam, 3 inches thick and up to 4 feet long (depending on how much camping equipment the purchaser may want to cram in) in each end of the boat before fitting the bulkheads. A foam pillar inside a sea kayak's watertight compartments is more or less protected from damage, so the cheapest, lightest sort of polystyrene foam can be used. It is easy to get because it is used by building contractors for thermal insulation inside roofs and steel buildings. If you crush a piece in your hand, you will see that it is made of small beads of foam.
If polystyrene foam blocks are not added before the bulkheads are fixed, it is possible to stand a completed kayak on end in a warm place and pour a liter of liquid polyurethane foam into each end through the hatches. This goes in as a thick liquid and expands inside the boat to form a plug of the precise shape of the inside end of the boat. The foam looks like the inside of a Crunchie bar if you're a Brit, or a Violet Crumble bar if you're an Aussie. Manufacturers at one one time regularly stood their new kayaks on end and poured in some two-part polyurethane foam, but the foam plug does tend to absorb some water over a long period. Also, the plug may eventually come loose from the hull and start bumping around inside the hull.
Polyethylene (PE/polythene) is available as a cross-linked closed-cell thermoplastic foam. It is quite expensive but so tough that archers use it for targets. PE foam is slightly compressible and flexible so it can be cut slightly oversized and wedged into position. It does not absorb water, does not rot if it is left wet, and seems to discourage mold. It can easily be cut to shape with a bread-knife. It is made under many trade names including Ethafoam, Plastazote LD45, Minicel, Jiffycell and Stratocell. It comes in a wide range of densities. For kayakers the most suitable density is low-medium, weighing 35 kg - 45 kg per cubic meter, which is 2-3 pounds per cubic foot. Thick slabs of PE foam are used to make the central pillars in whitewater kayaks and to make Hydrospeeds with which shivering tourists swim down mountain rivers. Thin medium-density PE foam is used to make high quality camping mats. Low and medium density foam is used as the flotation inside PFDs, and to pad kayak helmets and seats for comfort and fit.
PE foam comes in a range of textures. Ethafoam has a coarse grain so that a piece of it looks like a bathroom pumice stone, but white. It is OK for most kayak outfitting. However if you intend to fit foam in a locations where your bare skin may rub against it in summer, you will need a PE foam with a very fine grain, such as LD45 or Minicel. These are more expensive than Ethafoam but superb for a cockpit pillar, back rest or to adjust a seat for a good, comfortable fit.
Don't bother contacting the manufacturers, wholesalers or converters of PE foam. They won't return your call unless you want to buy enough to fill at least one semi-trailer. Good kayak stores stock Ethafoam or Minicel in slabs, typically 3 inches thick and 6 feet 6 in long by 3 feet wide. They also have rolls of thinner Minicel with waterproof adhesive on one side for padding kayak seats. They will sell you as much or little as you need. See Retail Outlets.
An easy method of retro-fitting foam buoyancy is to install a pillar of PE foam inside the cockpit, as in a whitewater kayak. This is a slab of foam 3 inches thick, upright between the kayaker's legs, going from the front edge of the seat down as far as the kayaker's ankles, wedged between the bottom of the kayak and the underside of the foredeck. The pillar does three things. It supports the deck for deep-water rescues; it reduces the "free water effect" which otherwise makes a kayak very unstable if the cockpit is half full of water; and it reduces the amount of water which will fit into a swamped cockpit. The only disadvantage is that it can be awkward to do solo self-rescue with a paddle float.
You can easily add a pillar to your sea kayak using PE foam and a bread-knife. A small pillar behind your seat makes an excellent back rest. See Back Support.
Buoyancy bags:
 Inflatable air bags are available in many shapes and sizes, and are suitable for both modern and traditional kayaks.
Bulkheads are great, but the Titanic had bulkheads. A modern kayak will be safer if buoyancy bags are put in through hatches and inflated inside the watertight compartments.
A traditional skin-on-frame (SOF) kayak can have both ends filled with a set of long, thin buoyancy bags and if they are transparent they won't much harm its looks. Using a long stick and plenty of bad language you can eventually persuade a deflated buoyancy bag to get right up inside the tip of a SOF kayak, which prevents water pooling in the end and making deep water rescue difficult. Some SOF builders attach a ring inside the tip and put a long continuous loop of cord through the ring, leading from there to the cockpit. By attaching the ends of the buoyancy bags to the loop, it is possible to drag them right up to the tip before inflating.
Commercially-made buoyancy bags are the most disappointing item of kayaking equipment because many of them split at the seams in less than a year. Not ideal if you're having a major kayaking drama in offshore wind and gathering darkness.
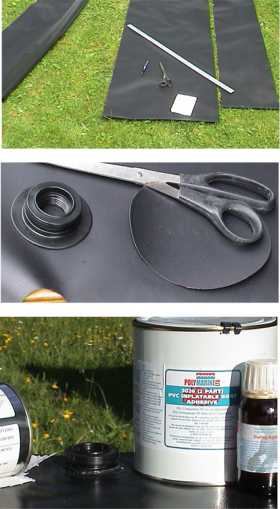
You could use adhesive and supple 0.40 mm PVC (vinyl) sheet to produce tailored buoyancy bags similar to those sold in kayak stores. It is easier to make durable bags if you use heat-sealable fabric from a specialist supplier, which can be welded with a household iron. See Retail Outlets.
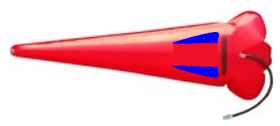
 Tom Yost's website at www.yostwerks.com or www.yostwerks.org inspired us to make some really tough inflatable sponsons out of the 350 g/m2 (10 oz / sq yd) fabric which is used for light tarpaulins. This is a woven polyester base fabric coated both sides with PVC. It is available by the yard from internet suppliers of tarpaulins and consumer plastics. With care, it can quite easily be solvent-welded to make very strong airtight seams.
To make a seam, you wipe acetone or MEK (methyl ethyl ketone) onto the parts to be joined, and let it dry for a few minutes. This cleans and slightly softens the PVC. Then apply a thin coat of PVC cement to both parts and press them together, making sure you get the parts correctly lined up before they touch. You can buy inflation valves and suitable PVC cement from specialist retailers of inflatable boats. The thickened PVC cement sold for plumbing is fine for pipe joints but not for PVC fabric.
Lessons learned: (1) Black is not the best colour because it gets very hot in summer. Some PVC glues soften when very hot, but the seams have lasted very well. (2) Plain square corners are easy to make, but they very quickly wear through against the inside of a fiberglass kayak so you get a tiny leak at each corner. Square corners are OK if you add a couple of extra layers of tarpaulin to the corners as wear protection. (3) Mice love to chew on anything inflatable.
Valves intended for inflatable dinghies, for inflation by mouth or pump, are very suitable except that they don't have a long inflation tube unless you add one yourself.
Commercially-made kayak buoyancy bags are inflated through a clear PVC tube one foot long which has a twist-lock valve at one end and a flange at the other to attach the tube to a buoyancy bag. The twist-lock valves are available from NRS in Idaho and you can get PVC tube from a hardware store, but putting a flange on the end is tricky. Tom Yost shows two solutions, one using electrical conduit connectors from his local hardware store. See the Accessories menu on www.yostwerks.com or www.yostwerks.org
| Go to next page for: • Footrest / foot brace • Back support • Skeg or rudder: • Deck elastics • Paddle park / tow point |