Accessories which are almost essential
![]()
Footrest / foot brace Back support Skeg or rudder: — skeg— rudder Deck elastics Paddle park / tow point
Spare Paddle Accessories Which Are Essential For Safety Other Accessories For The Kayak How To Add Accessories To A Kayak Equipment Checklists
A strong footrest is useful for comfort, control, power and safety. An experienced kayaker uses his or her whole body to paddle forwards. Every time (s)he takes a stroke, one foot presses firmly against the footrest. In the words of the BCU Coaching Handbook "each foot compresses the footrest to gain support for the stroke on that side".
When rolling, you can make sure you don't just fall out of the kayak by pressing against the footrest to force your knees up into the knee braces. If you ever surf your kayak, even accidentally, it is possible you may come to an abrupt halt by crashing into the sand or a rock. So that you do not slide forward off your seat and have your sprayskirt rip off the cockpit, you need a strong footrest.
Many older sea kayaks have a light, simple and effective footrest which consists of two horizontal flanges, one inside each side of the kayak. Each flange is about 18 inches long and 1.5 inches wide, and is permanently attached halfway up the side of the kayak. A row of holes is drilled along each flange at one-inch intervals. The footrest is a horizontal aluminum tube which bolts to a hole on each side. You can adjust the footrest to fit taller or shorter kayakers by bolting it to the most suitable holes.
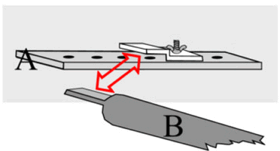 This is OK, but in a crash the kayaker's feet can go beyond the footrest and make it hard to escape. Therefore only one end of the bar should be attached with a bolt. The other end should sit in a quick-release "Failsafe" fitting, the white object in the diagram. You can get them from kayak stores.
In the diagram, A is the left flange and B is the left-hand end of the footrest tube. The end of the tube has been flattened to fit into the Failsafe clip.
Most commercial footrests now take one of three forms:
a) The simplest is a non-adjustable row of five or six plastic steps, one row on each side of the kayak. You just sit in the kayak and put your feet on the least uncomfortable steps. Not satisfactory.
 b) Better ones consist of a pair of adjustable nylon or aluminum pedals (A), one on each side of the kayak, which slide along nylon or aluminum tracks (B). One trade name for this sort of footrest is Yakima. You can quickly slide the pedals to a comfortable position. They don't take up much space, so you can straighten your legs and have a good stretch if you get stiff during a long paddle. Unless adjustable footrests are often adjusted or cleaned, they tend to jam after long use in salt water, and the aluminum ones corrode.
c) Then there are platform footrests which fill almost the entire width of the kayak and are attached to notched bars on the side of the kayak so you can adjust them.
If you are very tall, no commercial footrest will fit you. You can easily make a good non-adjustable footrest out of closed-cell polyethylene foam, cut to shape with a bread-knife so that it fills in all the space between your feet and the front bulkhead. It gives the kayak extra flotation, is comfortable and acts as a shock-absorber if you crash into something. If you leave a foot-sized slot in the middle, you will be able to partly straighten one leg at a time for comfort during a long trip.
It is not essential to have a back support in your sea kayak but it does help you maintain a good posture for long periods, and keeps you on the seat if you crash into something solid while surfing backwards.
For some kayak rolls you have to lean all the way back until your head nearly touches the rear deck. Also, good paddling action requires you to turn your upper body from side to side with every stroke, so any firm support higher than the level of the lumbo-sacral joint (L5-S1) will cause chafe.
Commercial backrests usually consist of a strap of nylon webbing stretched from one side of the seat-back to the other. The strap is adjustable and padded. This works quite well.
 Quite a lot of kayakers now use a home-made backrest, carved out of polyethylene (PE) foam which works very well. Interestingly, one major manufacturer of sea kayaks now offers these instead of the regular nylon webbing strap, saying that a foam block weighs less, is more comfortable, and does not get stuck under you when you're trying to wriggle back into your kayak during a deep-water rescue.
We have mentioned the use of a vertical pillar of PE foam between the kayaker's knees. A similar pillar can be installed in the small space between the back of the seat and the rear bulkhead, using a small block of PE foam cut to shape with a bread-knife. Where the vertical front edge of the pillar rises above the back of the seat, cut it away in a line leading up to the back of the cockpit coaming. If the line is a convex curve rather than a straight line, it can give effective back support exactly where you want it. It is particularly comfortable when you stop paddling and lean backwards.
Inflatable lumbar supports are available for kayaks, but we haven't tried one.
Some sea kayaks misbehave badly in crosswinds and really need a skeg or a rudder.
Both of them reduce weathercocking. This is the tendency of most kayaks, on open water with the wind coming from the side, to turn slightly into the wind. You can resist this by paddling technique as discussed at Coping With Wind From The Side but it gets tiring after 20 minutes.
Well-designed rudders have been available for sea kayaking since the 1970s. Britain, France, New Zealand and Tasmania all get a lot of windy weather. Most English and French sea kayakers have a skeg or nothing but rudders are quite popular in Scotland, we are told that in Tasmania nearly 100% of sea kayaks have a rudder, and Sandy Ferguson of New Zealand tells us "NZ is windy and just about all... kayakers use or have rudders, not necessarily deployed all the time".
"One of the Eskimos here has a small wooden fin attached to the bottom of his kayak about a yard from the stern: It is ten inches long and four inches deep at the most. Most of the kayakmen on the West Coast [of Greenland] use them to counteract the sidewise motion caused by each stroke of the paddle, and also to keep the kayak steady in a side wind. It is unsuitable for conditions here, as it would be more difficult to dodge around in thick ice and would prevent the hunters sliding their kayaks from an ice-floe down into the water".
F Spencer Chapman, Watkins' Last Expedition, 1934
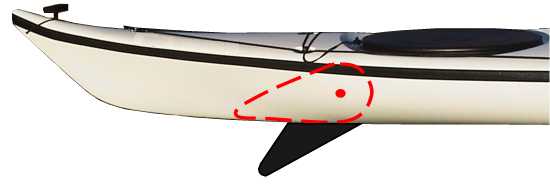
A skeg is a fin under the stern, which looks like an under-stern rudder but does not move from side to side. It can be fixed or adjustable.
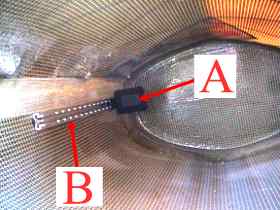
Drop skeg. An adjustable skeg works just like the centerboard of a dinghy. The fin pivots inside a vertical slot so it can be dropped down into the water when needed. It is usually made of a rigid plastic which is intentionally weak. If it gets forced in the wrong direction because you reverse into a rock, it will snap off before it damages the kayak's structure.
The skeg control is a rod or slider alongside the cockpit from which wires or rods extend back to the skeg. It can be fully up, fully down or (in lighter winds) partly down.
Detachable skeg. If your kayak has no skeg, does have a tiring tendency to weathercock in side winds, and you don't mind if you reduce its maneuverability in caves and amongst rocks, you can add one. If you have a general-purpose kayak that could mean a detachable skeg which you fit in seconds before going afloat on a windy day. Some traditional Inuit skegs attached with straps, just like this one from Feathercraft:
Is this as good as the 1980s polypropylene skeg? This was a big sleeve of thin plastic that you slipped over the back end of the kayak and pulled forwards until it jammed. Then you attached it with a length of shock-cord that you clipped to the decklines. The fin was permanently riveted to the belt. Light, folds flat, won't come off or flop over however many rocks you hit, and practically indestructible. Your editor still has one somewhere that turns up every few years.
Fixed skeg. If you have a fiberglass or wood sea kayak that has no skeg and seems to need one, it's easy to add a permanent fixed skeg. In general see How To Add Accessories To A Kayak. You can make the fin from fiberglass. Its total area is seldom much more than that of your hand. It must have a low profile so that it does not catch on rocks in shallow water, and so that it does not prevent the kayak sliding down a beach for a "seal launch". If you look at your kayak from the side, you will see that the line of the keel is almost straight for the central 80% of the hull. The keel line has only a slight upward curve ("rocker") over most of its length. Near the stern it starts to curve up more sharply. A fixed skeg usually extends the straighter line of the central section backwards over a length of about 18 inches, so that the bottom edge of the skeg is almost horizontal. The rear edge of the skeg is almost vertical, finishing well short of the tip of the stern. After all, a skeg is supposed to be an underwater fin.
You can make the fin from three layers of medium-weight chopped strand mat (CSM) fiberglass reinforcement, laying it down on a flat surface covered with a layer of polyethylene, and using a brush to saturate it with a small amount of polyester resin. Leave it in a warm place for a couple of days to get really hard, and you can then use abrasive paper to smooth and shape it. As with an aircraft wing, you want a rounded (parabolic) leading edge and a sharp trailing edge. See Making Rudders, Leeboards & Foils.
To attach the finished fin to the hull, make what boat-builders call a "fillet" along each side. For each side, cut three strips of CSM. Each strip should be slightly longer than the skeg and 1 to 2 inches wide. Use abrasive paper to clean and roughen the parts of the hull and skeg where you are making the fillets. Hold the skeg in place temporarily with adhesive tape. Make the fillets on one side at a time, with the kayak lying on its side so gravity encourages the resin and CSM to stay where you put them. Mix a small amount of resin and brush a little onto the roughened parts to make them slightly sticky. Place the first strips along the hull-skeg join so that they are half on the skeg and half on the hull. Use a little more resin to wet them out, then lay the second strips on top and wet them out, using as little resin as possible but making sure you eliminate all bubbles and white patches. Same for the third strips. Turn the kayak over and do the other side.
The surface of a CSM laminate is very rough and usually needs to be smoothed when fully hard, using abrasive paper. You can reduce the amount of smoothing by placing a smooth plastic tape over it while it is still wet. Peel Ply if you have it, polythene or sellotape if you don't.
A better but more expensive solution is to make the fillets by applying a paste of epoxy resin thickened with microfibers or colloidal silica. Use a stick with a rounded end (like a physician's "tongue depressor") to shape it.
According to the Gougeon Brothers' technical publication Epoxyworks 16 (Fall 2000) it is possible to stick a fixed skeg to a polyethylene kayak using two-part epoxy resin if you prepare the surface properly. The article recommends first sanding the surface with 80 grit abrasive paper. Then, less than 30 minutes before you apply the epoxy it says you should oxidize the surface of that part of the hull using a propane blowtorch. The idea is to keep the tip of the flame just above the surface and "move it across the surface at a rate of 2 or 3 inches per second, overlapping the previous pass slightly. Keep the torch moving and only allow the exhaust gases to hit the surface. If done correctly, the surface will not discolor or burn in any obvious way". An interesting idea, but you would spend the next X years wondering if the back end of your kayak was now dangerously brittle.
 Rudders made specifically for sea kayaking tend to be an expensive blend of stainless steel and carbon fiber ("graphite"). Good ones are designed so that they project down deep into the water but allow the kayaker to raise them out of the water before entering surf or rocky areas. Some retract by flipping up onto the rear deck as shown, others have a blade which slides upwards in a case like a daggerboard.
Well-designed rudders have been available for sea kayaking since the 1970s. A rudder lets you steer with your feet instead of your paddle, and acts as a skeg to stop weathercocking in side winds. See Coping With Wind From The Side.
A rudder may be operated by a small tiller fitted to the front bulkhead between the kayaker's feet, connected to the rudder with control cables made of stainless steel. There are also stirrup-type rudder controls and combined rudder-footrests consisting of a horizontal tiller bar where you would expect to find a foot rest. The tiller bar is not fixed at the ends, but mounted on a vertical pivot in the middle so the kayaker presses with his/her right foot to go right. These arrangements are fine as long as they don't prevent effective use of the footrest.
Those who don't like rudders cite a variety of reasons. Some are unwilling to drill holes through the hull or deck of their kayak for the rudder attachment or the control cables, or cut the rear 6 inches off their kayak, which is often necessary to fit a rudder. Others suspect that a rudder is heavy (4.5 lbs is a common total for the rudder and controls), easy to damage, likely to jam when small stones get between the rudder stock and the blade, and could make it hard to reverse out of a cave in a hurry.
Although a sea kayak rudder has a small blade, it still creates significant drag even if it is pointing directly forwards-backwards. When you use a rudder to turn or to stay on course, you are putting on the brakes on one side. Usually you can achieve the same thing by substituting, for a forwards paddle stroke, the occasional forwards sweep stroke. This will knock you back on course without slowing you down. See Forwards Sweep Stroke.
Expedition kayakers who go long distances on open water with laden kayaks very often swear by rudders. Paul Caffyn, the great kayak circumnavigator, says he started off "suffering from the Pommy anti-rudder sentiment" but was gradually converted. By steering with his feet, he is able to maintain a smoother paddling rhythm and he calculates that it increases his daily average distance by nearly 25%. See his website.
It is good to have a clean empty deck so there is nothing for the wind or waves to grasp, but there are times when you need to carry things on deck.
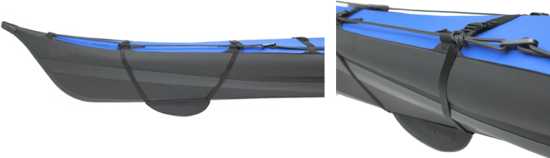
 It is usual to have a criss-cross pattern of shock cord (bungee cord) just in front of the cockpit, to hold a chart extract or a deck bag and as a very temporary paddle park. You can attach shock cord securely by stretching it from one deck fitting to another.
Some shock cord disintegrates quickly if exposed to salt water and sunlight. Use a top-quality 6 mm to 8 mm (1/4" to 5/16") shock cord intended for use on sailboats. See Retail Outlets.
The other thing usually stored on deck is a spare paddle. You can attach it safely with shock cord. If you also glue small blocks of foam plastic to the deck, you can prevent it sliding around and scratching the deck. You can buy self-adhesive foam sheet from a good kayaking store. See Retail Outlets. Spare paddles are usually stowed on the rear deck so they are out of the way. If your spare paddle is stowed on the front deck, there is more chance that you will be able to grab and assemble it upside down, so you can roll up after losing your main paddle.
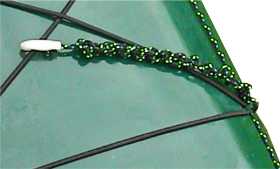 |
Very useful. Weighs and costs almost nothing. At times you may need to attach your paddle to your kayak for a few minutes, or tow another sea kayak by attaching the front of it to your deck rigging at the front of your cockpit. For the technique, see Towing A Kayak. You can do both jobs with a single length of 3/16" diameter cord, 18 inches long. Permanently attach one end of it to the deck lines at the front of your cockpit, on the right side if you are right-handed. |
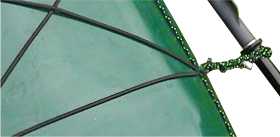 |
Just tie it on. Put a cheap, lightweight nylon snap-hook on the other end, of a size large enough to clip onto 3/16" cord. The paddle park in the illustration is actually 5 feet of cord, chain-coiled to a total length of 1 foot. Of course, if you think you may need your paddle in a real hurry you won't clip it to a paddle park - you will put one blade under the criss-cross elastics on your foredeck or just lie it across your lap. |